How to Integrate Azure Functions with MongoDB
MongoDB Atlas, the database as a service provided by the creators of MongoDB, is available on all the major cloud providers including Microsoft Azure. In this tutorial, I’ll cover the integration of Microsoft Azure Functions with MongoDB Atlas from a developer standpoint.
What are Azure Functions? In a nutshell, Azure Functions are the core building blocks of Microsoft’s serverless technologies. You can write your Azure Functions code in a variety of languages and execute it at scale without worrying about the underlying virtual machine and operating system. While the concept of Azure serverless functions is not drastically different than in other public cloud providers, Microsoft emphasizes tighter integrations with other technologies in their stack, such as Azure Storage Blobs and Azure Event Hubs. Azure Functions are open sourced on GitHub.
In this tutorial, we will cover how to integrate MongoDB Atlas with your serverless Azure functions to perform CRUD operations. We will use the Visual Studio development environment as well as leverage the .NET MongoDB driver.
Scenario: MongoDB Online Grocery Store
To help showcase how to use MongoDB within an Azure Function, we are going to present the scenario where we have an online grocery store website and would like to run a function that would be called when a web user rates a particular product in our inventory. A typical product in the inventory collection resembles the following document:
{
   "_id" : ObjectId("5bbe188f52994c0d38de437c"),
   "PLU" : 4011,
   "Description" : "Bananas",
   "AverageRating" : 3,
   "Ratings" : [
   	{
   		"Rating" : 3
   	},
   	{
   		"Rating": 4

   	} ]
}
As users rate the product, these new ratings are appended to the Ratings array. Our function will also calculate the average rating given this new rating and update the document in an ACID compliant transaction. To keep our code short, each rating in our example just has an integer value of "Rating," but in a real production system, you may have many other metadata tags for a particular rating: the user who created the rating, the date of creation, etc. MongoDB has a flexible schema so adding additional fields later is simple and does not disrupt existing data in the database or clients accessing the database (i.e., no expensive schema migrations!).
Note: Since we are focusing on the MongoDB integration, we will not set up or include Azure authentication with the Azure Function. In any real implementation, you should always lock down access to your functions.
By the end of this tutorial you will have a better understanding of how to do the following:
-
Setting up your Visual Studio development environment
-
Creating an Azure Function within Visual Studio
-
Writing a transactional MongoDB query with the .NET MongoDB Driver
-
Connecting the Azure Function to MongoDB Atlas
-
Deploying and testing the Azure Function
Setting up your development environment
First, you should make sure you have at least Visual Studio 2017 installed on your Windows machine. The Community Edition is enough, but the Professional and Enterprise Edition also work with this tutorial. When installing Visual Studio 2017, make sure you select the Azure Development as shown in Figure 1 (as well as any other workload you wish to install).

Figure 1: Visual Studio Workload selection dialog
If you already installed Visual Studio 2017, but did not install the Azure development workload, you can do so by going to Settings → Apps & features, find the Visual Studio 2017 app, and select Modify.
Later in this tutorial, we will be issuing REST API calls to our Azure Function. There are many tools that can be used to make these calls, like cURL and Postman. In this tutorial, we will use Postman, which can be downloaded for free from http://getpostman.com.
Creating your MongoDB Atlas Cluster
If you do not have access to a MongoDB cluster, you can create a free fully managed one by following the tutorial found in this link. Once you have access to a MongoDB Atlas cluster, there are two important things to note about its configuration.
First, in a MongoDB Atlas cluster, there is no connectivity from the outside world by default. Thus, you will have to specify the IP address range of any clients that will need to connect directly to the database. This includes the IPs that Azure uses when running your Azure Functions as well as any development machines if needed. Pay special attention to the IP Whitelist section of the tutorial. In this tutorial, we will first deploy locally and then to Azure. For now, make sure you add your local IP address to the list of allowable IPs via the "Add IP Address" button in the Security -> IP Whitelist menu. Once we deploy our project into Azure, we will return to this dialog and add the IP addresses of our project running on Azure servers.
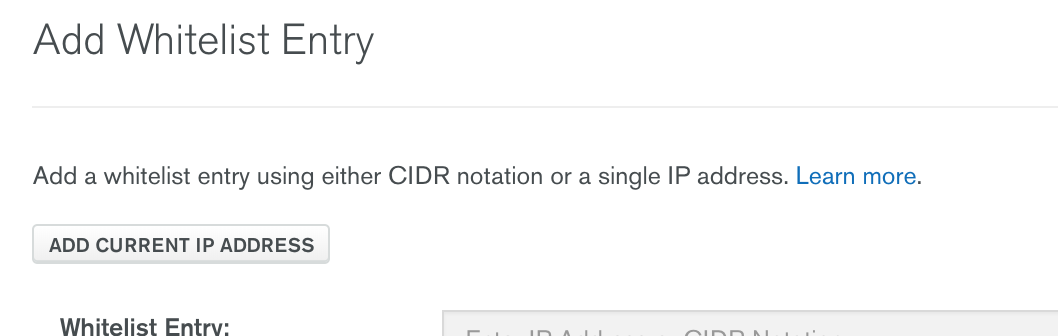
Figure 2: Add Whitelist Entry dialog
Second, you will need to have a user credential created that will be used to access the MongoDB cluster. To create a user fill out the Add New User dialog by selecting the Add New User button located in the Security -> MongoDB Users menu in the Atlas cluster.
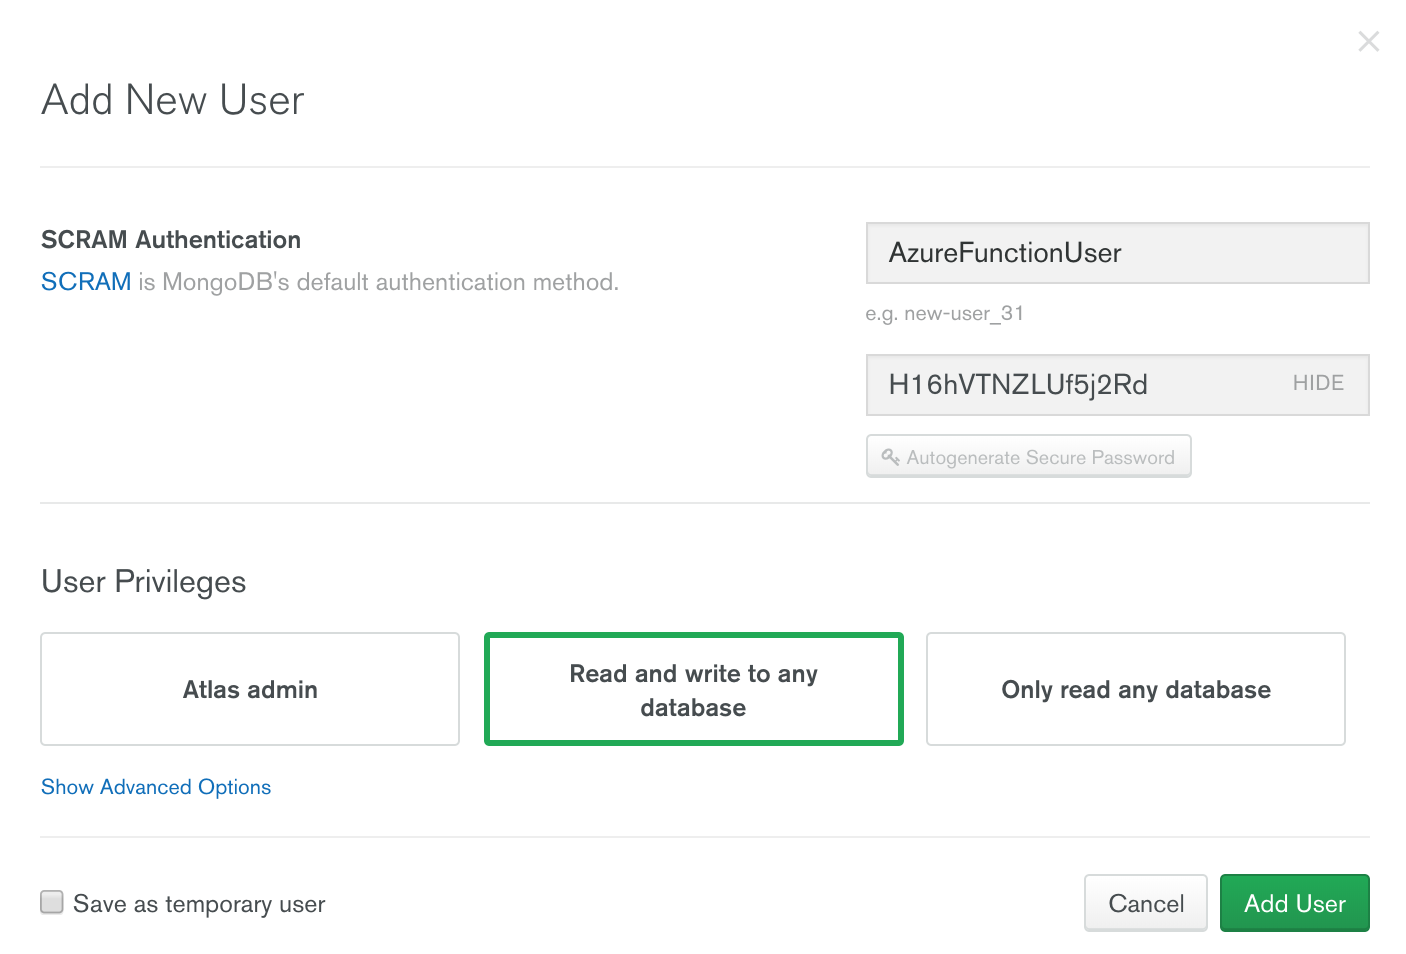
Figure 3: Add New User dialog
At this point, you should have a MongoDB Atlas cluster created, the local IP address of your development machine added to the cluster’s whitelist, and a user credential created for use by the Azure function. Now we are ready to create the Azure function!
Creating an Azure function in Visual Studio
Azure Functions offer a wide choice of programming languages, such as C#, F#, Node.js, Python, PHP, and more. Given that C# is the language of choice of most Microsoft developers, this tutorial will focus on developing and deploying an Azure function using C#.
To create the Azure function, open Visual Studio 2017 and select File → New → Project. Select the Azure Functions type under the Installed Menu Item and give your project a name (for instance, MongoOnlineGrocery).
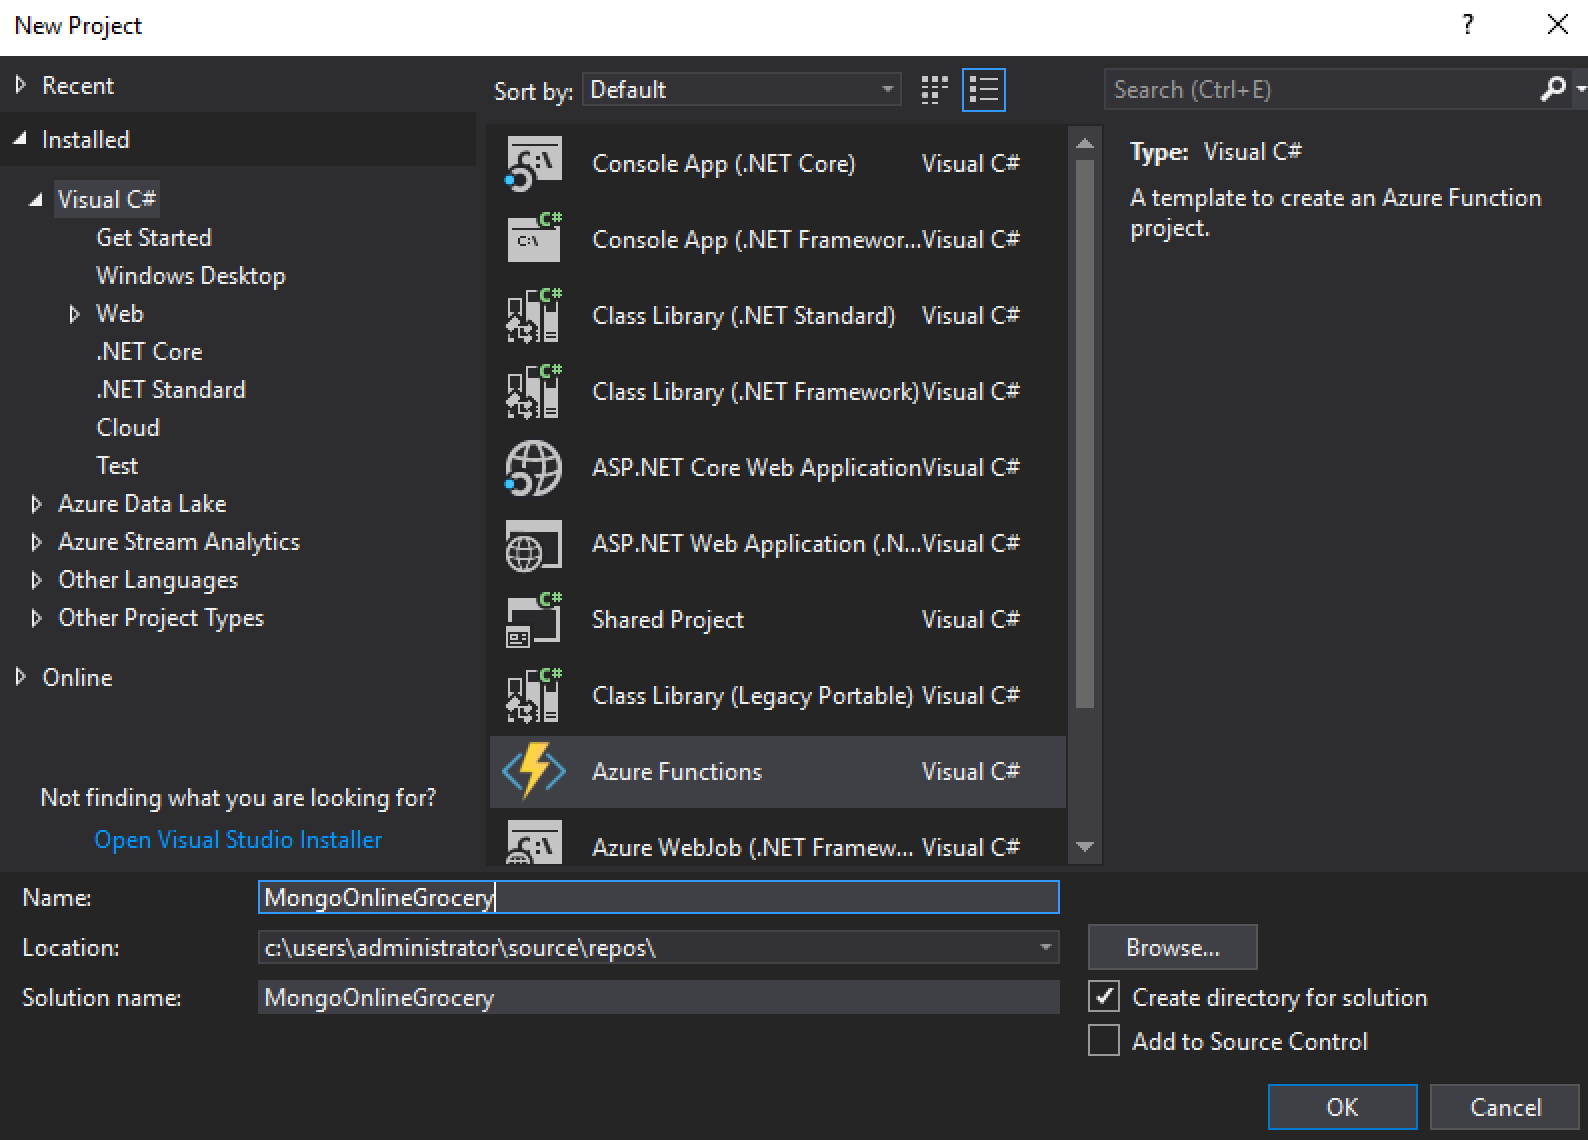
Figure 4: New Azure Functions Project
Once you click OK, you’ll be asked what type of Azure Functions project you would like to create. Some of the options are seen in Figure 5. Select HTTP Trigger from the list and Anonymous access rights. The HttpTrigger function type will allow us to use our function as a REST API, which we’ll be able to call from cURL, Postman, or any custom application.
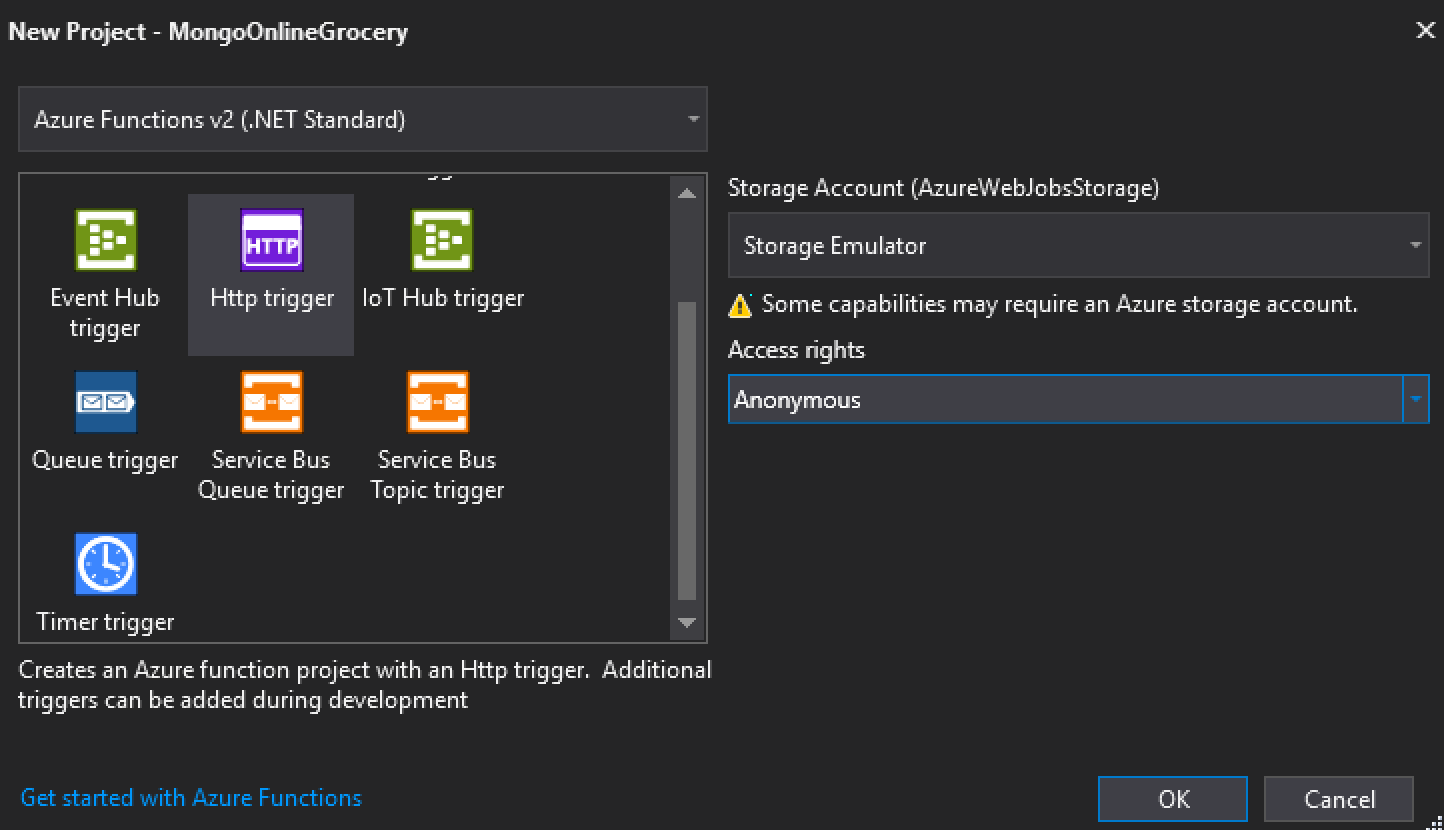
Figure 5: Function type dialog
Once you click OK, Visual Studio will create some boilerplate files that are used to support the Azure function. One file is called function1.cs, and this is the code of our function. We can rename the function to something more appropriate, like ProdReviewFunc.cs by right clicking on the function1.cs file in the solution explorer and selecting Rename.
The other notable file that is created is called local.setting.json. Here is where you should place all your environment variables, like connection strings. When you are ready to deploy your project into an Azure function, the variables defined in *local.settings.*json are easily changeable from within Azure. For more info on environment variables in Azure, see this article: https://docs.microsoft.com/en-us/azure/azure-functions/functions-dotnet-class-library#environment-variables
At this point, we have our ProdReviewFunc.cs file created with boilerplate code showing the *public static async Task Run(...) method. We changed the value of the function name to ProductReview. This method is invoked every time you call your function endpoint, which by default is http://localhost:7071/api/ *on your local machine (http://localhost:7071/api/ProductReview in our case).
Let’s take a closer look at that Run(...) method:
[FunctionName("ProductReview")]
public static async Task<IActionResult> Run([HttpTrigger(AuthorizationLevel.Anonymous, "get", "post", Route = null)]HttpRequest req, ILogger log)
-
The FunctionName attribute that determines your function url (so use caution if you want to update it).
-
The AuthorizationLevel is set to Anonymous as previously configured when creating the function. Unless your end goal is to have a function which anyone on the planet including hackers can access, you may want to lock access to this down. Setting authentication and authorization for Azure functions is beyond the scope of this tutorial, so for detailed information on locking down your Azure function, check out the Authentication and authorization in Azure App Service article.
-
Get and post parameters indicate that the function can be called with the GET or POST HTTP methods. Typically, the GET method is used to retrieve data, the POST method to create data, the PUT method to update data, and the DELETE method to, well, delete data. Since we only want to use this function to update a document in MongoDB, let’s remove the get parameter and let’s keep the *post *parameter.
-
By default, Azure Functions have a route prefix on all functions: /api/. This can be changed by using the Route parameter. For this tutorial, we will leave it in the default setting.
Installing the .NET MongoDB Driver
In order to write any C# application connected to a MongoDB database, you need the MongoDB .NET driver. Information about using C# and the .NET driver can be found in the C# and .NET MongoDB Driver documentation. To add the .NET driver to your Visual Studio application, you can add the NuGet package by right-clicking on your Visual Studio project and selecting *Manage NuGet Packages. *In the NuGet Package Manager, select the Browse tab and search for "MongoDB".

In the search results, select MongoDB.Driver, make sure you choose the latest version of the driver, and press Install. Note that transaction support starts in the .NET Driver version 2.7.
The MongoDB .NET driver requires dependent assemblies (MongoDB.Bson and MongoDB.Driver.Core), so accept the Apache 2.0 license for these three libraries and continue.
Writing a Demo Setup Function
Now that our development environment is set up, we can start building out the code that will support our application. Since we want to rate a particular inventory item, we first need to build the inventory itself. Rather than point to a web location and have you import the data into MongoDB Atlas, let’s create a function that will prepare the database for the demo. This function will remove any inventory, create an index on the PLU field (to ensure uniqueness), and insert a few sample items.
Updating the local.settings.json file
Before we get into writing any functions, create an environment variable, MongoDBAtlasConnectionString that will be used to store the connection string to our database.
Open the local.setting.json file and add the MongoDBAtlasConnectionString line in the Values document as follows:
{

   "IsEncrypted": false,

   "Values": {

   "AzureWebJobsStorage": "UseDevelopmentStorage=true",

   "FUNCTIONS_WORKER_RUNTIME": "dotnet",

   "MongoDBAtlasConnectionString": "<<GET THIS FROM MONGODB ATLAS>>"
 }
}
Your MongoDB Atlas connection string can be obtained by navigating to your MongoDB Atlas cluster and pressing the Connect button, as shown in Figure 6:
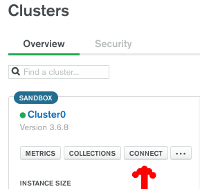
Figure 6: Connect button
Next, under Choose a connection method, press Connect your application, then select the SRV Connection String (3.6+ driver). This will display the connection string with a blank password. Copy this SRV address and paste it as the value to your MongoDBAtlasConnectionString parameter in the local.settings.json file. Remember to change the value of
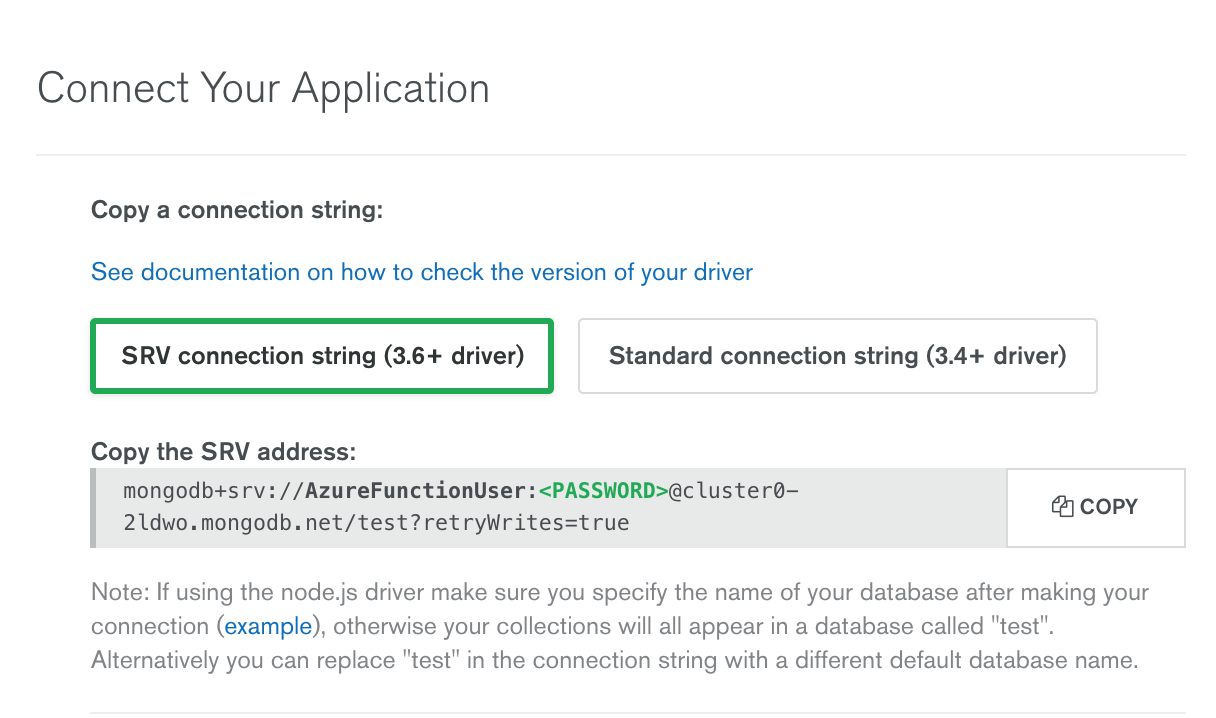
Figure 7: Connect Your Application dialog
Creating our Product and Product Ratings objects
One of the best features of MongoDB is that an object-relational mapping layer is not needed. You can define an Object and insert it directly into the database as is. Let’s start by including the additional MongoDB and system libraries we will use in this scenario and define our ProductRating and Product objects as follows:
…

using MongoDB.Bson;
using MongoDB.Driver;
using MongoDB.Bson.Serialization.Attributes;
using System.Collections.Generic;

...

namespace MongoOnlineGrocery
{
    public class ProductRating
    {
        [BsonElement("Rating")]
        public int Rating { get; set; }
    }

    public class Product
    {
        [BsonId]
        public ObjectId Id { get; set; }


        [BsonElement("PLU")]
        public int PLU { get; set; }

        [BsonElement("Description")]
        public string Description { get; set; }

        [BsonElement("AverageRating")]
        public Double AvgRating { get; set; }


        [BsonElement("Ratings")]
        public List<ProductRating> Ratings { get; set; }

    }
Next we can define our Reset Demo function as follows:
[FunctionName("ResetDemo")]
        public static async Task<IActionResult> RunGet([HttpTrigger(AuthorizationLevel.Anonymous, "get", Route = null)]HttpRequest req, ILogger log)
        {
            try
            {

                var client = new MongoClient(System.Environment.GetEnvironmentVariable("MongoDBAtlasConnectionString"));
                var database = client.GetDatabase("MongoOnlineGrocery");
                var collection = database.GetCollection<Product>("inventory");
                //We could also just drop the collection
                await collection.DeleteManyAsync(new BsonDocument { });
                await collection.Indexes.DropAllAsync();

                //Create an index on the PLU, this will also enforce uniqueness
                IndexKeysDefinition<Product> keys = "{ PLU: 1 }";
                var indexModel = new CreateIndexModel<Product>(keys);
                await collection.Indexes.CreateOneAsync(indexModel);

                //Create a default rating of 3 for new products
                var MyRating = new ProductRating();
                MyRating.Rating = 3;
                var DefaultProductRating = new List<ProductRating>();
                DefaultProductRating.Add(MyRating);

                //Define some sample objects
                var Bananas = new Product
                {
                    Id = new ObjectId(),
                    PLU = 4011,
                    Description = "Bananas",
                    Ratings = DefaultProductRating
                };
                var Apples = new Product
                {
                    Id = new ObjectId(),
                    PLU = 3283,
                    Description = "Apples",
                    Ratings = DefaultProductRating
                };

                //MongoDB makes it easy to go from object to database with no ORM layer
                await collection.InsertOneAsync(Bananas);
                await collection.InsertOneAsync(Apples);

            }
            catch (Exception e)
            {
                return new BadRequestObjectResult("Error refreshing demo - " + e.Message);

            }

            return (ActionResult)new OkObjectResult("Refreshed Demo database");
        }
At this point, we could run our application by issuing a GET method to http://localhost:7071/api/ResetDemo as seen in Figure 8:
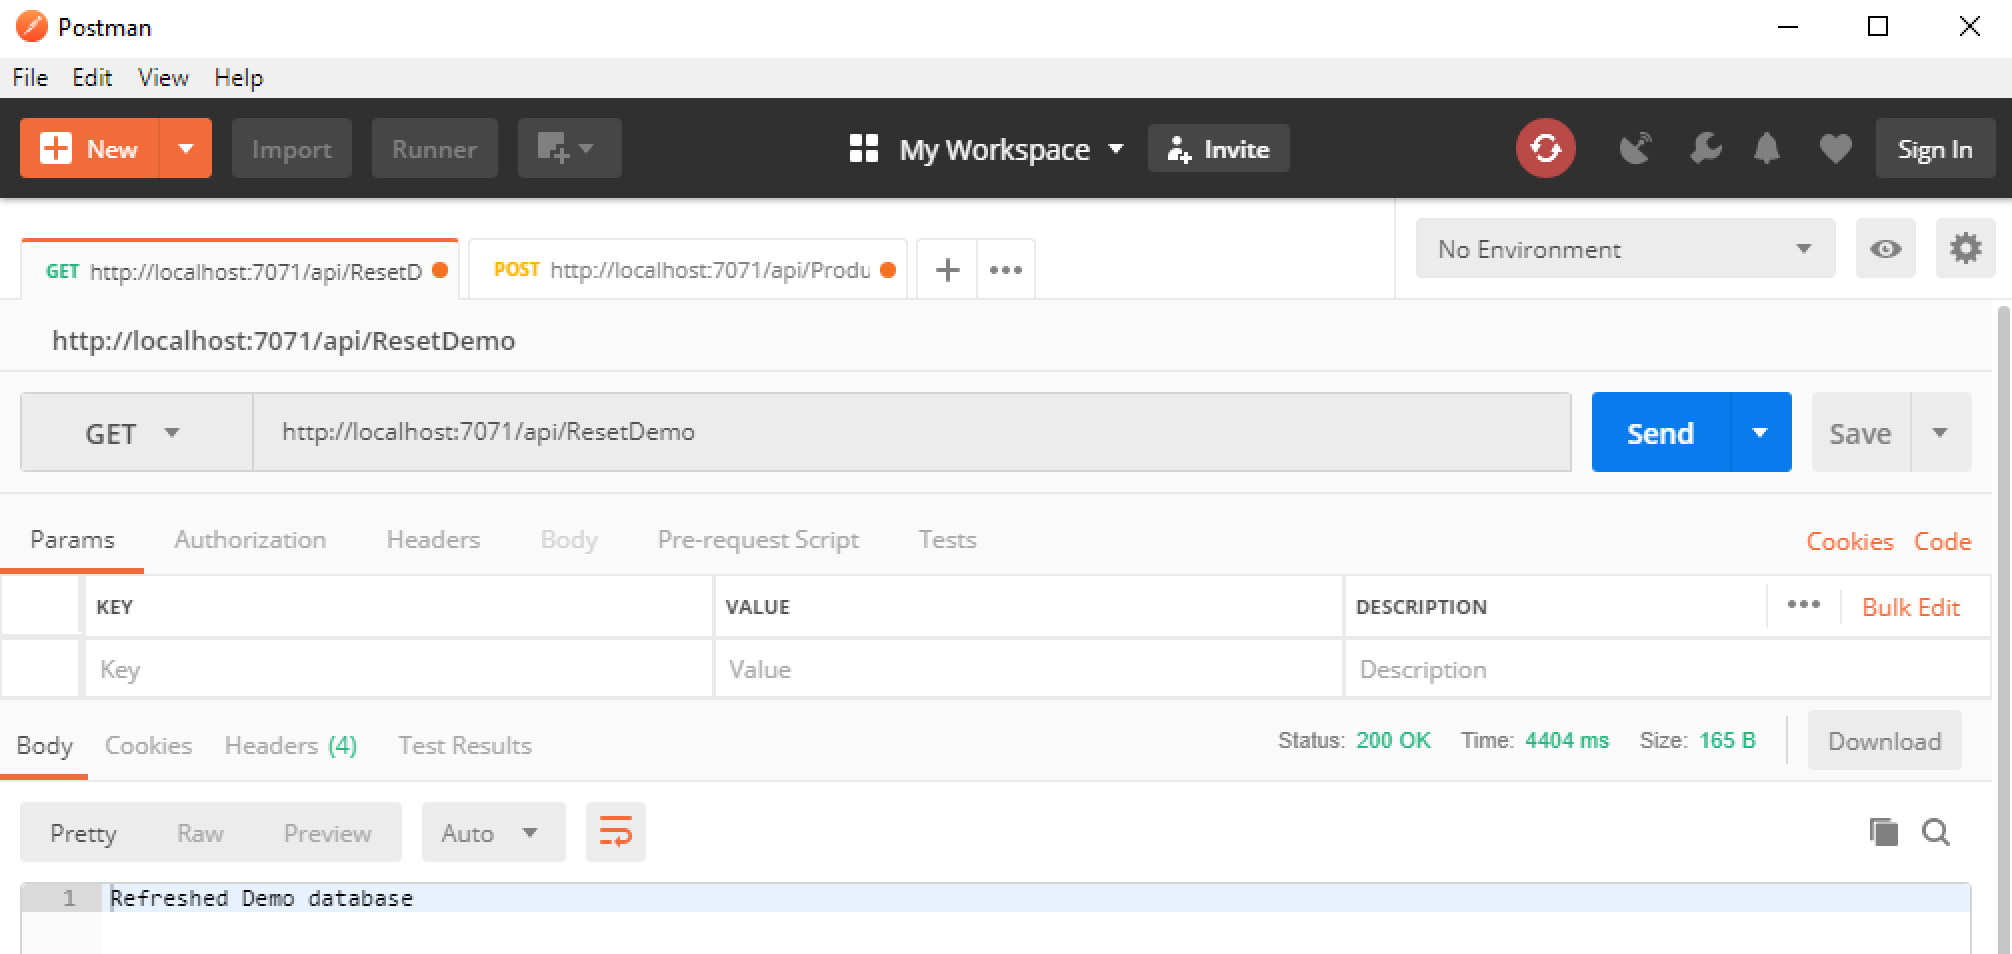
Figure 8: Results within Postman from calling the ResetDemo API
If all was successful you should see the text Refreshed Demo database in the result. If you connected to your MongoDB Atlas cluster your MongoOnlineGrocery database would have an inventory collection that would contain these documents:
{
	"_id" : ObjectId("5bbe37eee8711710a0abd4f0"),
	"PLU" : 4011,
	"Description" : "Bananas",
	"AverageRating" : 0,
	"Ratings" : [
		{
			"Rating" : 3
		}
	]
}
{
	"_id" : ObjectId("5bbe37eee8711710a0abd4f1"),
	"PLU" : 3283,
	"Description" : "Apples",
	"AverageRating" : 0,
	"Ratings" : [
		{
			"Rating" : 3
		}
	]
}
Writing the Product Review function with MongoDB .NET Driver
Now we are ready to create the ProductReview function. As mentioned previously, this function takes two parameters: PLU," which is an integer that identifies the item, and "Rating,” which has to be a value between 1 and 5. At a high level, the function works as follows:
-
Perform input data integrity checks (i.e., make sure rating is between 1 and 5)
-
Make a connection to MongoDB Atlas and start a transaction
-
Add the user rating to a specific PLU item
-
Calculate the average using the MongoDB Aggregation Pipeline
-
Update the PLU item with the latest average and commit the transaction
The code for the ProductReview function is as follows. Be sure to read through the comments within the code for more information.
 [FunctionName("ProductReview")]
        public static async Task<IActionResult> Run([HttpTrigger(AuthorizationLevel.Anonymous, "post", Route = null)]HttpRequest req, ILogger log)
        {
            int iPLU = 0;
            int iRating = 0;
            Double iAvg = 0;

            if (Int32.TryParse(req.Query["PLU"], out iPLU))
            {
                iPLU = Int32.Parse(req.Query["PLU"]);
            }
            else
            {
                return new BadRequestObjectResult("Please pass a PLU parameter");
            }

            if (Int32.TryParse(req.Query["Rating"], out iRating))
            {
                iRating = Int32.Parse(req.Query["Rating"]);
                if (iRating<1 || iRating>5)
                {
                    return new BadRequestObjectResult("Rating must be between 1 and 5");
                }
            }
            else
            {
                return new BadRequestObjectResult("Please pass a Rating parameter");
            }

            //Create client connection to our MongoDB Atlas database
            var client = new MongoClient(System.Environment.GetEnvironmentVariable("MongoDBAtlasConnectionString"));

            //Create a session object that is used when leveraging transactions
            var session = client.StartSession();

            //Create the collection object that represents the "inventory" collection
            var collection = session.Client.GetDatabase("MongoOnlineGrocery").GetCollection<Product>("inventory");

            //Begin transaction
            session.StartTransaction();

            //Append the rating to the PLU
            var filter = new FilterDefinitionBuilder<Product>().Where(r => r.PLU == iPLU);

            //For now to keep code short, our ratings are just an array of integers, in future we could easily add more metadata like user, date created, etc.
            var MyRating = new ProductRating();
            MyRating.Rating = iRating;

            var update = Builders<Product>.Update.Push<ProductRating>(r => r.Ratings, MyRating);
            var options = new UpdateOptions() { IsUpsert = true };

            try
            {
                //Add the rating to our product
                await collection.UpdateOneAsync(filter, update, options);

                //Calculate the average rating
                /* Equivalent Mongo Query Language statement:
                 *
                 * db.inventory.aggregate( [
                 * { $match: { "PLU":4011 }},
                 * { $unwind: "$Ratings" },
                 * { $group: { _id: "$_id", AvgRating: { $avg: "$Ratings.Rating" }}}
                 * ])
                 */

                //Building out the Group pipeline stage
                List<BsonElement> e = new List<BsonElement>();
                e.Add(new BsonElement("_id", "$_id"));
                e.Add(new BsonElement("AvgRating", new BsonDocument("$avg", "$Ratings.Rating")));


                PipelineDefinition < Product,BsonDocument> Pipe = new BsonDocument[]
                {
                    new BsonDocument {{ "$match", new BsonDocument("PLU", iPLU)}},
                    new BsonDocument {{ "$unwind", new BsonString("$Ratings")}},
                    new BsonDocument {{ "$group", new BsonDocument(e)}}

                };
                var AverageRating = await collection.AggregateAsync<BsonDocument>(Pipe);

                //We filtered it down to only average a specific PLU
                var o = AverageRating.First();
                iAvg = o["AvgRating"].AsDouble;

                //Now that we calculated the average update the PLU with the latest average
                var updateavg = Builders<Product>.Update.Set(r => r.AvgRating, iAvg);
                await collection.UpdateOneAsync(filter, updateavg);

                //Made it here without error? Let's commit the transaction
                session.CommitTransaction();

            }
            catch (Exception e)
            {
                session.AbortTransaction();
                return new BadRequestObjectResult("Error: " + e.Message);
            }


            return iRating > 0
                ? (ActionResult)new OkObjectResult($"Added Rating of {iRating} to {iPLU}.  Average rating is {iAvg}")
                : new BadRequestObjectResult("Please pass a PLU and Quantity as parameters");
        }
    }
You now have a fully functioning, "ProductReview" API supporting the POST method.
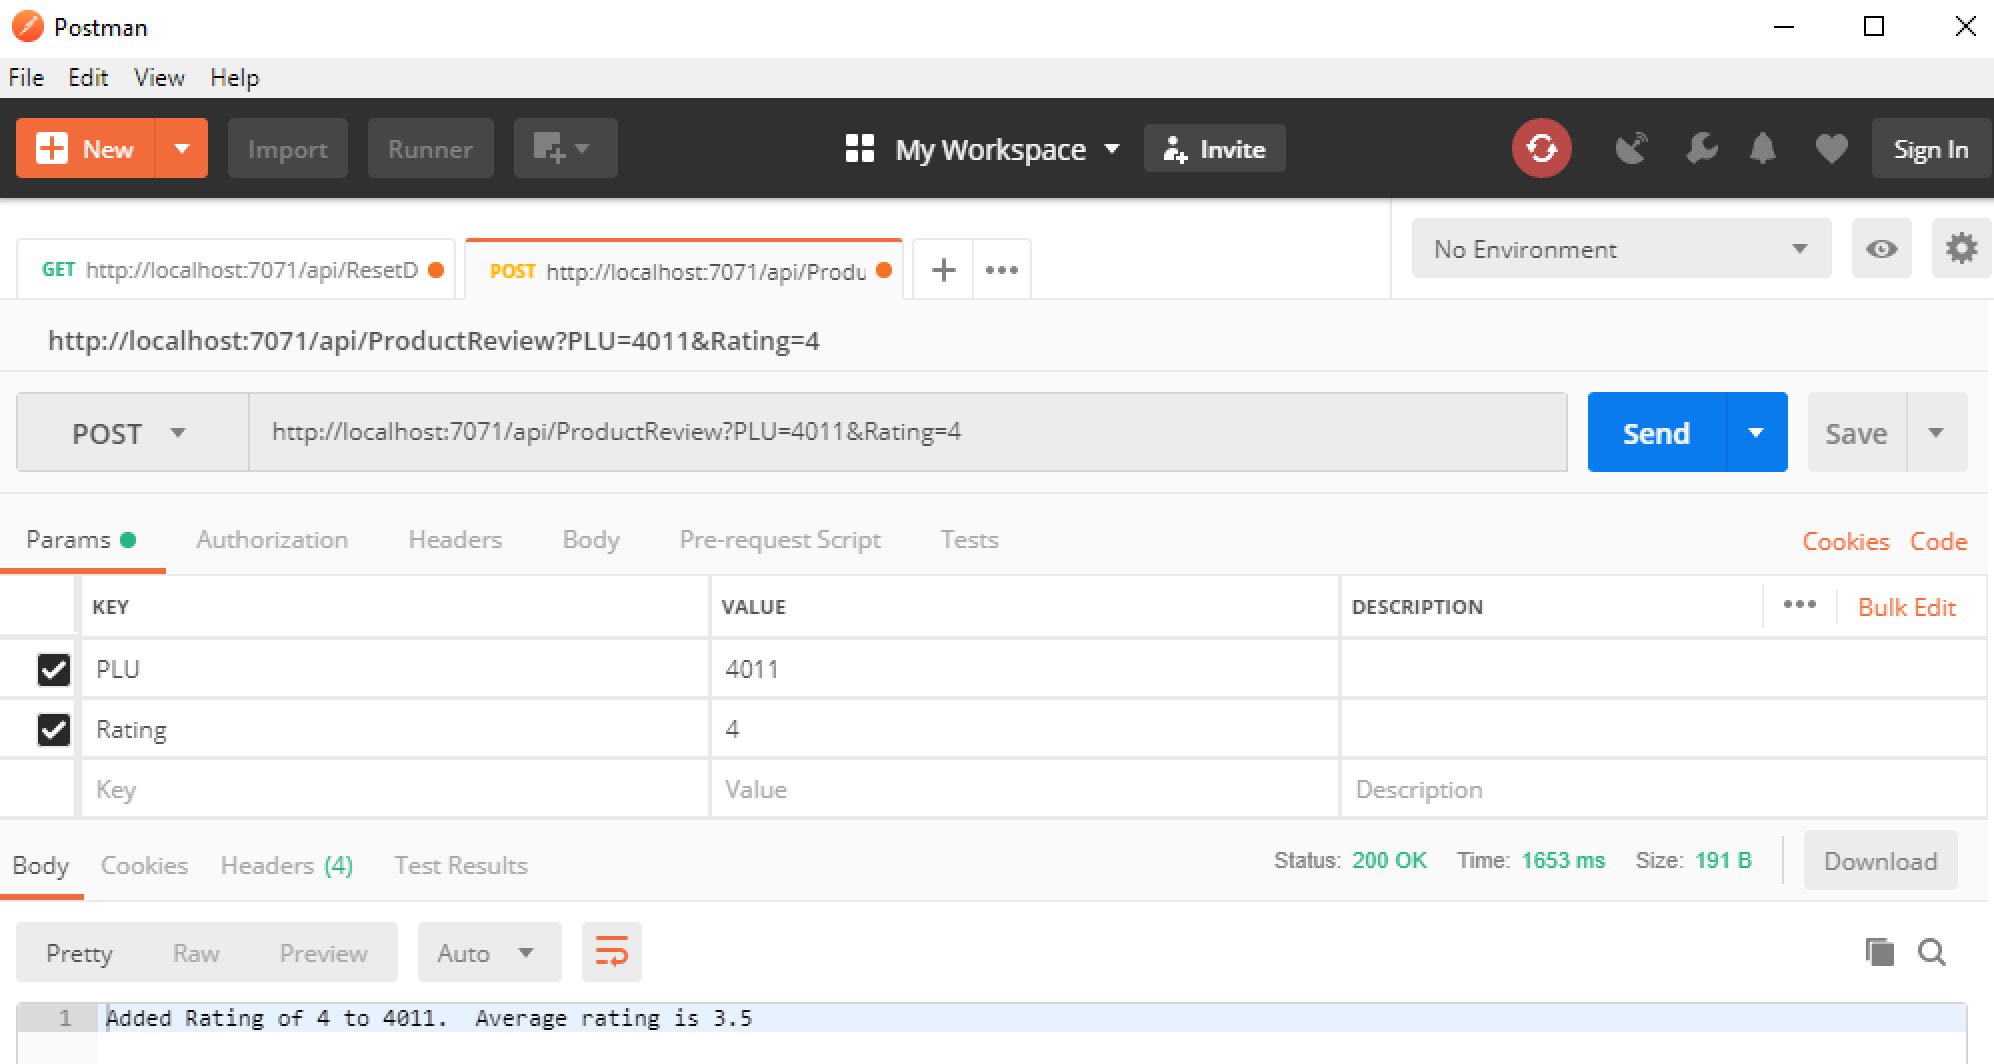
Figure 9: Results from ProductReview API call
If we now query our inventory collection we can see we added a rating of 4 to the array and updated the average of 3.5 to the document as follows:
{
	"_id" : ObjectId("5bbe37eee8711710a0abd4f0"),
	"PLU" : 4011,
	"Description" : "Bananas",
	"AverageRating" : 3.5,
	"Ratings" : [
		{
			"Rating" : 3
		},
		{
			"Rating" : 4
		}
	]
}
For more information on transactions within MongoDB, check out the online documentation: https://docs.mongodb.com/manual/core/transactions/.
For more information about MongoDB Aggregation Pipeline stages, check out the online documentation: https://docs.mongodb.com/manual/reference/operator/aggregation-pipeline/.
Deploy the Azure function to Microsoft Azure
Now that we’ve verified that all the tests above are successful, let’s move forward and deploy our function to Azure. You can deploy your Azure function using Continuous Integration (CI) tools such as Azure DevOps (formally known as Visual Studio Team Services) or the Azure CLI, but we’ll take a simpler approach in this post by using the GUI available in Visual Studio 2017.
To publish the project to Azure, select, "Publish" from the Build menu in Visual Studio. A wizard will take you through the deployment process by asking you which Azure subscription to create the function in, the storage account, the region, etc.
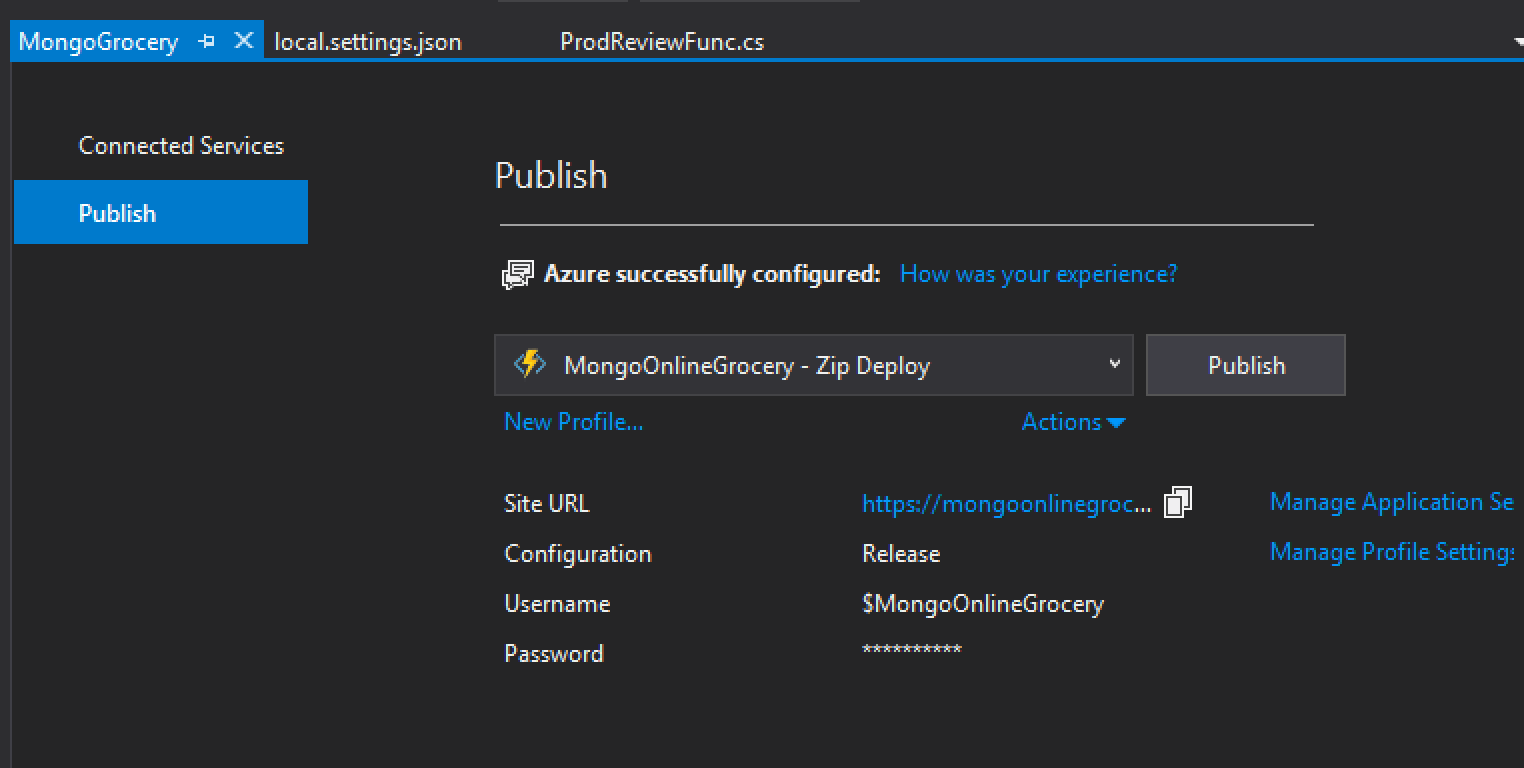
Figure 10: Azure publish wizard successful completion
We can tell Azure to use our same MongoDB Atlas connection string by clicking on the Manage Application Setting link and selecting, "Insert value from local" where there is no remote value entered, as seen in Figure 11.
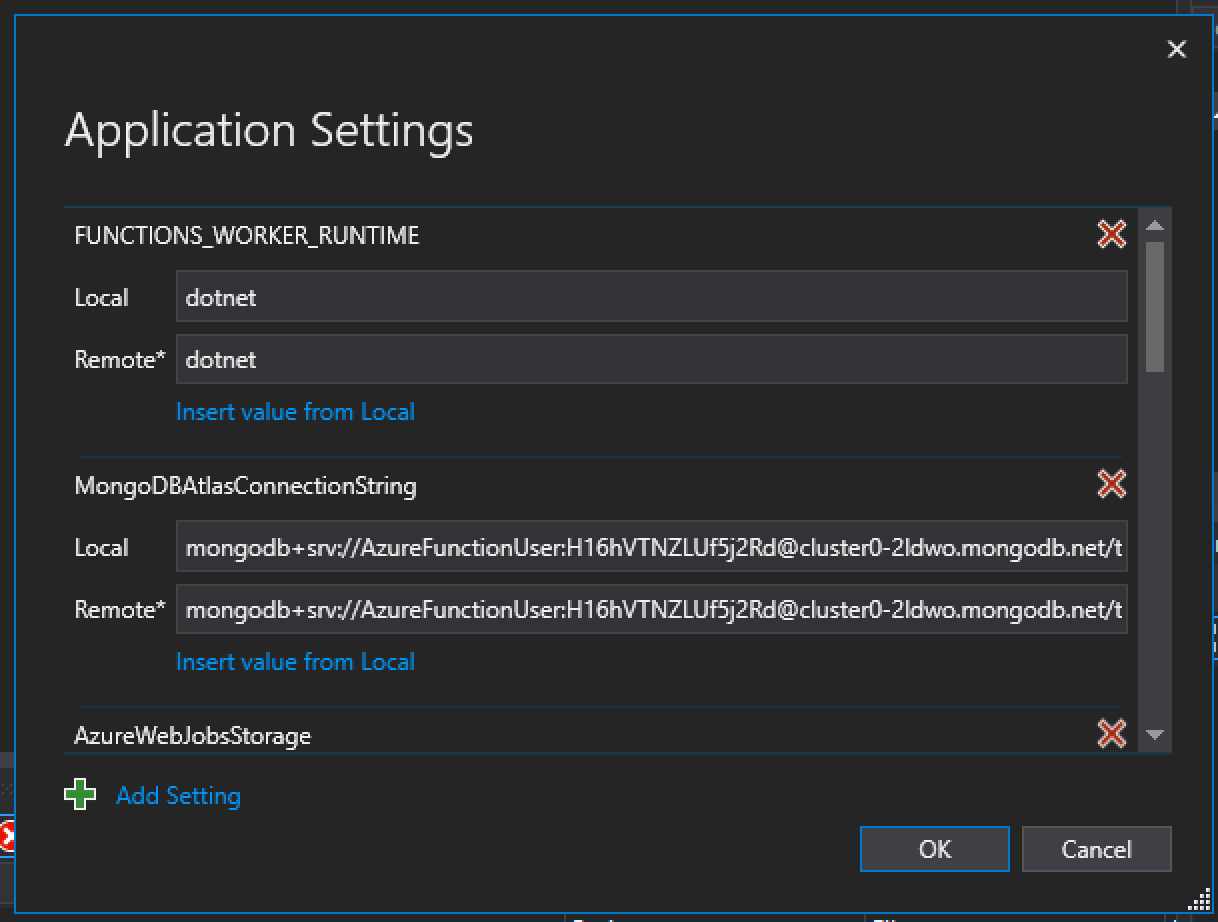
Figure 11: Application Settings dialog
Now that we updated our environment variables, click Publish again; once that’s finished, our site is live at the Site URL listed. However, we are not ready to go live yet, there is just one more step to make the magic happen. Remember that all IP connections to our MongoDB Atlas database are blocked by default. Since the connections will be coming from an Azure server and not our development box we need to add the IP Address of the server that is running our Azure function. To do this, go to the Azure Portal and select your App Service. In our tutorial, it is called, "MongoOnlineGrocery," as seen in Figure 12.
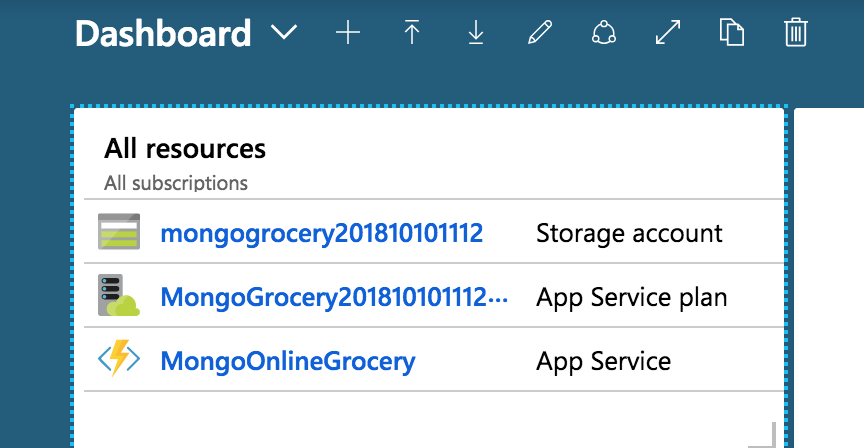
Figure 12: Azure Portal showing the MongoOnlineGrocery App Service
Next, click on Platform Features, then Properties, as shown in Figure 13.
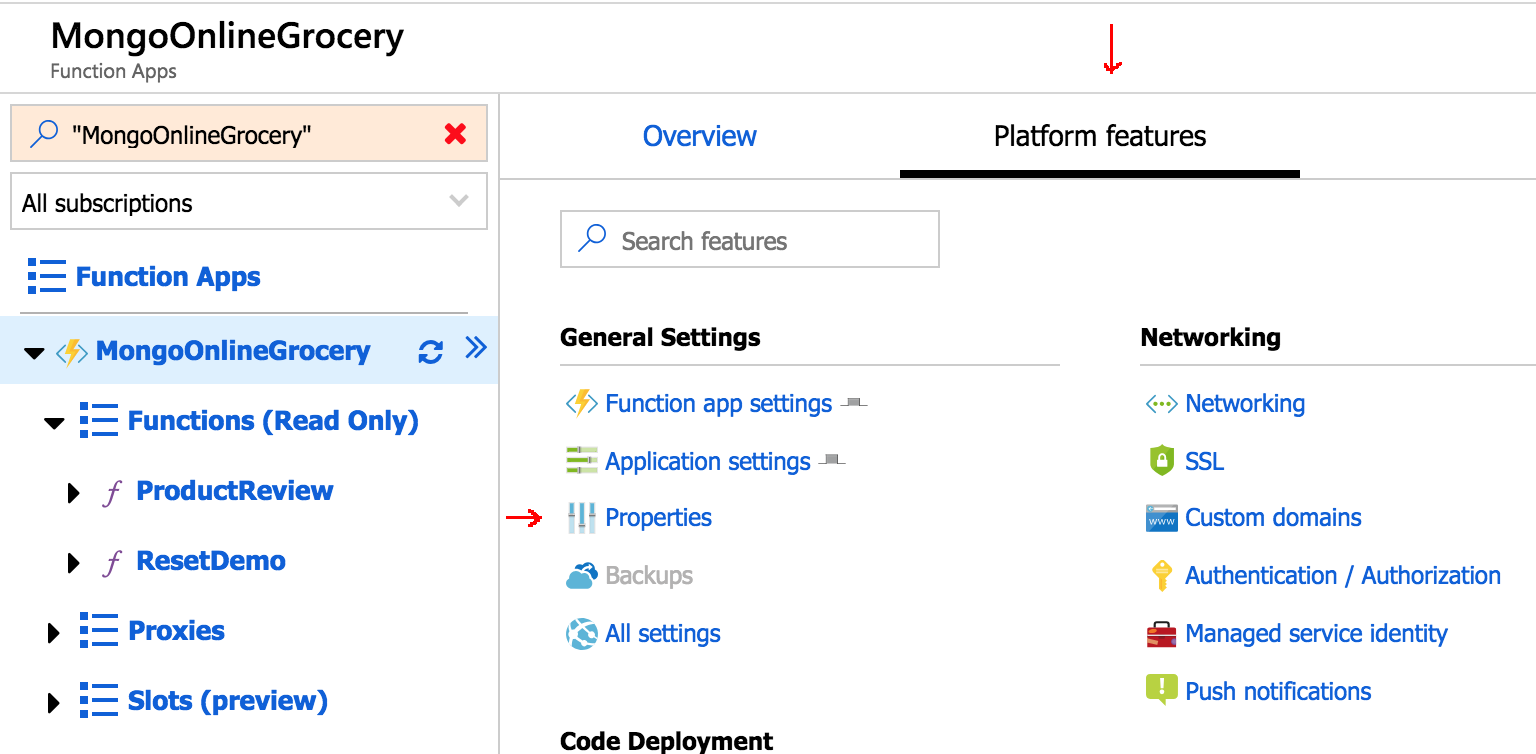
Figure 13: App Service Properties
Copy the IP address listed in the "Virtual IP Address" and navigate to your MongoDB Atlas cluster. Under the Security menu, click “IP Whitelisting,” then click the “+ ADD IP ADDRESS” button and paste in the Virtual IP Address you obtained from the Azure properties page. Once you add this IP address, you can test your application by issuing GET and POST statements like these:
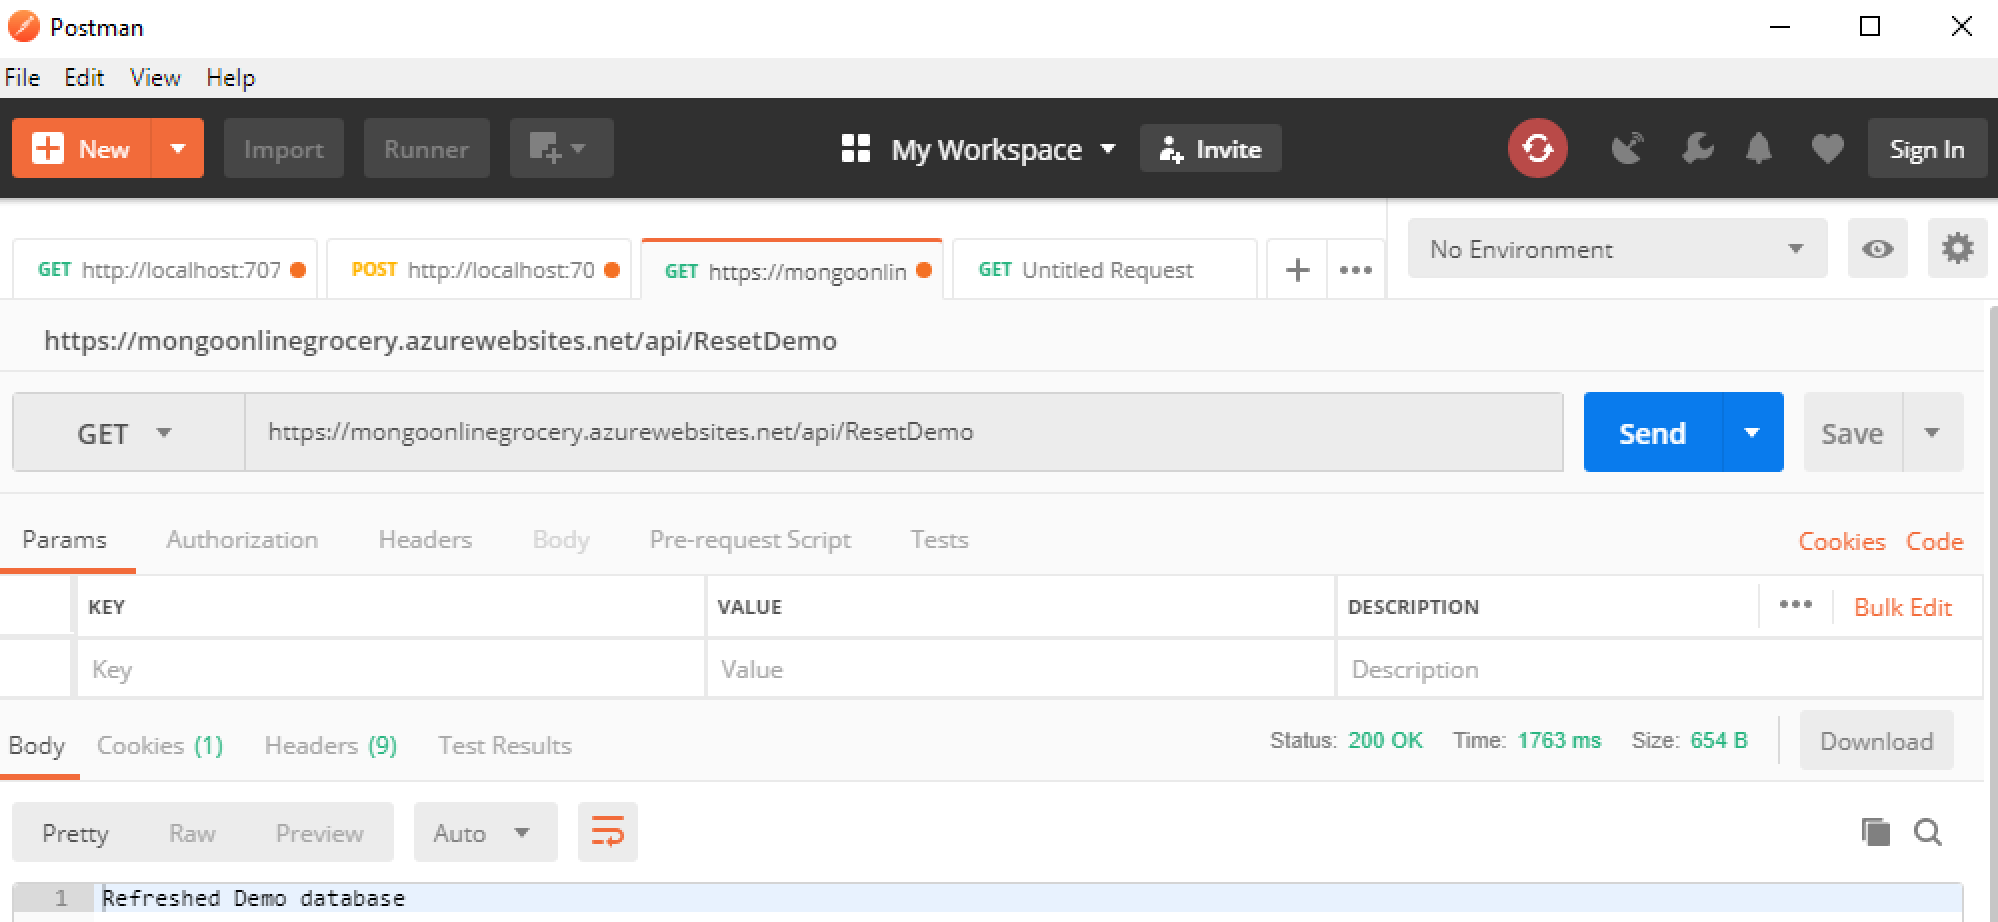
Figure 14: HTTP GET method / ResetDemo to our Azure function
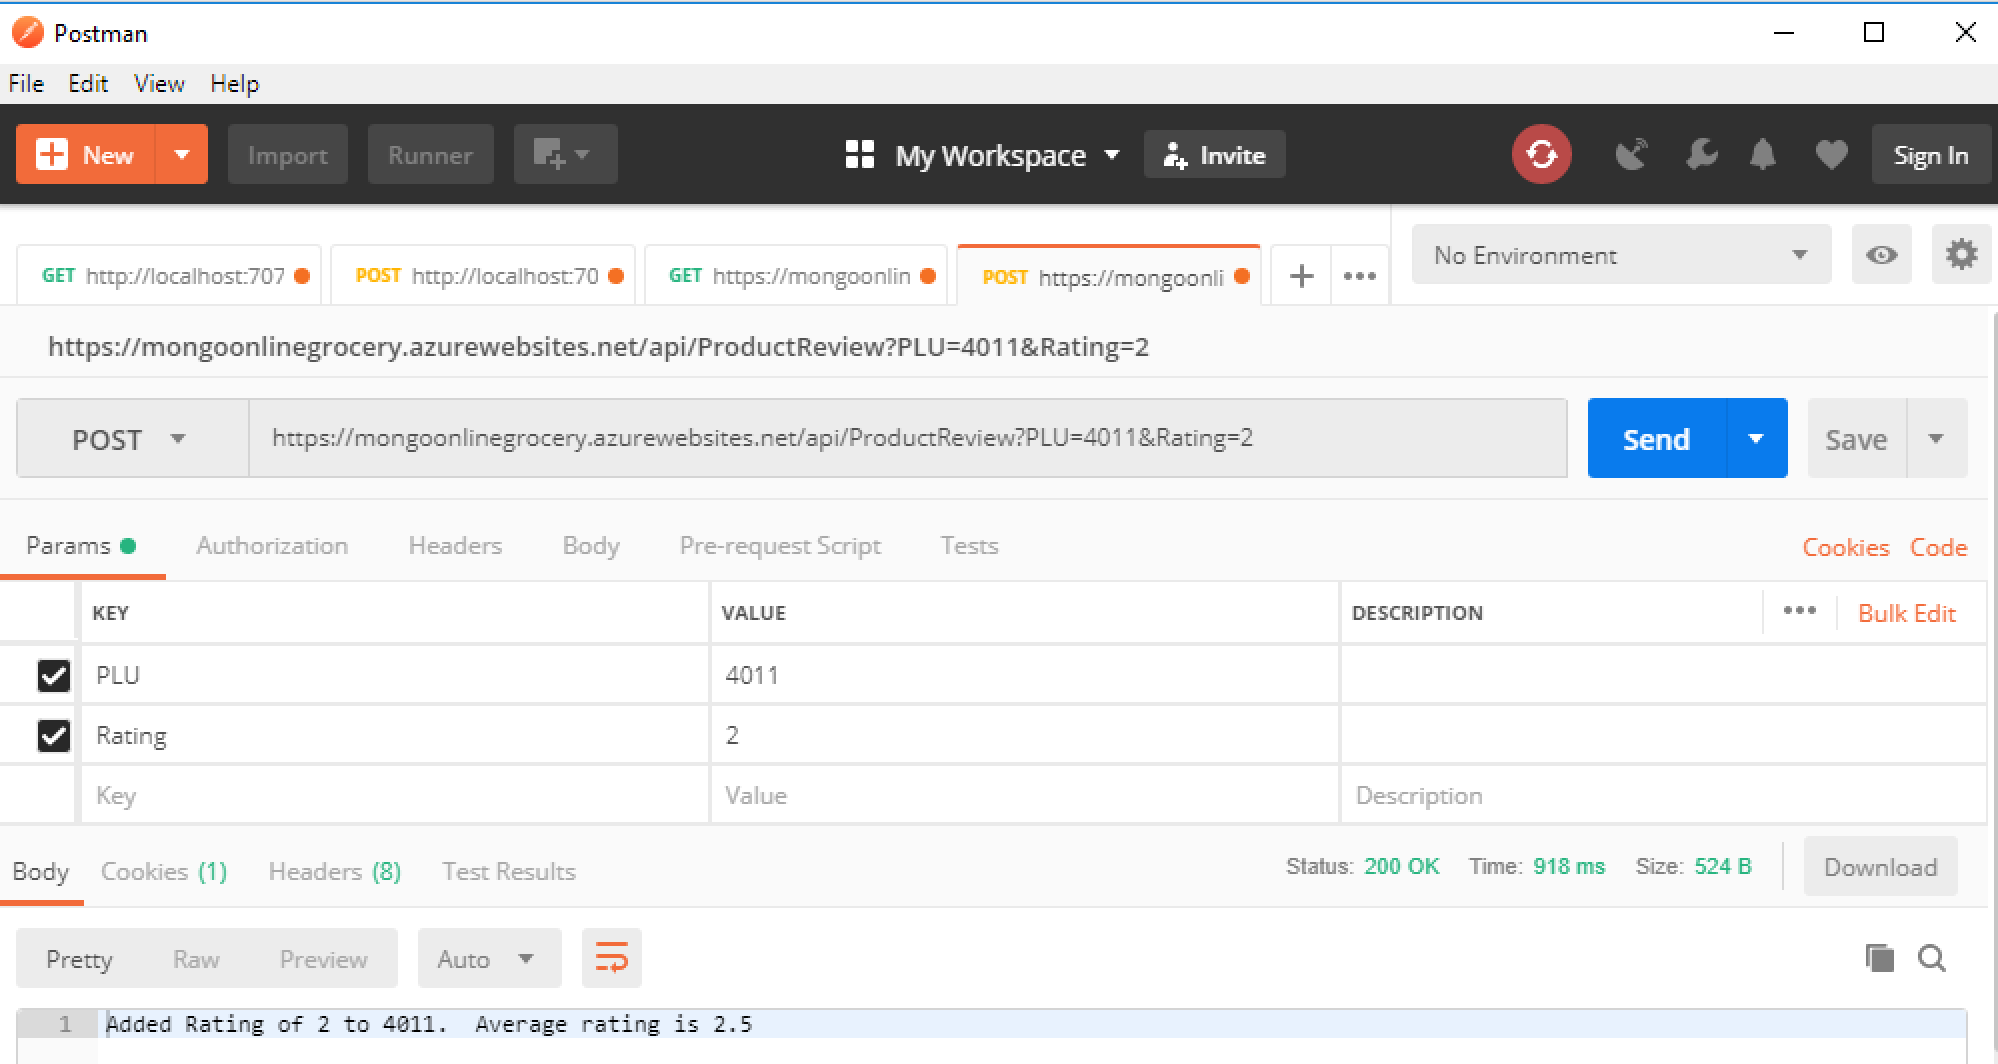
Figure 15: HTTP POST method / ProductReview to our Azure function
Conclusion
Azure Functions and MongoDB Atlas are the best of both worlds: serverless architecture integrated with database-as-a-service empowers developers to get their applications to market faster.
Azure Functions execute code at scale without your worrying about provisioning and managing the underlying virtual machine and operating system. MongoDB enables developers to quickly bring ideas to life without letting the database get in the way of productivity. Together, the Azure platform and MongoDB provide the developer with an extremely fast way to make ideas a reality.
In this tutorial, you saw more ways developers benefit with MongoDB. With MongoDB developers can take a C# object and place it directly in the database without complicated object-relational mapping code. Different versions of the application can co-exist easily with MongoDB’s flexible schemas. We also explored how to create a transactional query and stand up a MongoDB Atlas cluster.
The C# source code for the functions is on GitHub.