
Handling auth is painful. But most applications need to authenticate users and control what resources they can access. Microservices, though growing in popularity, can add complexity. You need to secure both the user’s actions and the interactions between services.
AWS offers some great building blocks for a microservices architecture. But like furniture from IKEA, you have to assemble the pieces yourself. Plus the instructions aren’t very good.
We’ll build a simple application and configure AWS to authenticate a user and secure a microservice.
TL;DR (for the impatient)
Working Demo: https://auth-api-demo.firebaseapp.com/ (user: demouser password: demoPASS123)
GitHub Repo: https://github.com/csepulv/auth-api-demo
Base Use Case/Assumption: There are two groups of resources — a) those that need an authenticated user and b) those that do not.
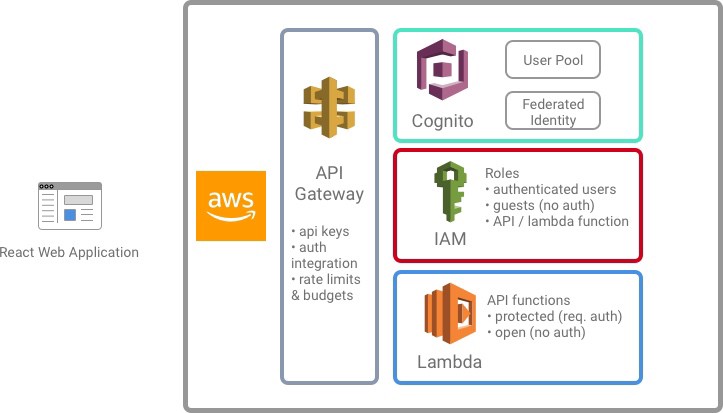
We’ll use
- AWS Lambda, API Gateway, and Cognito
- Claudia.js (for building our API)
- React (for our web client)
For those who read till the end, there are some goodies.
Now, for the details.
Conceptual Application Model
The demo application implements the following model.
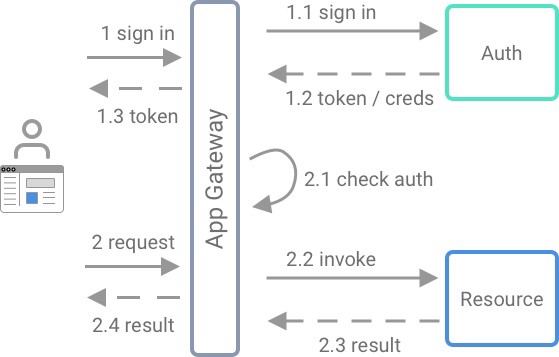
- A user signs into an application and gets an authentication token
- AWS uses this token to verify identity and to authorize user requests for protected resources
- the App Gateway creates a virtual moat between users and application resources
AWS Services
If you are new to AWS, there is the official AWS Getting Started portal. Also, Udemy has a free course, AWS Essentials.
You will need access to an AWS account. You can signup for the AWS free tier.
AWS Lambda
While EC2 is one of the most popular AWS options, I think Lambda is better suited to microservices. EC2 instances are virtual machines. You are responsible for everything from the operating system to all the software it runs. Lambda is a Function as a Service model. There is no server provisioning or deployment; you write your service logic.
For more info, refer to the AWS Lambda docs.
But there is a wrinkle with Lambdas. They can’t be directly reached by an application user. Lambdas need triggers that invoke the Lambda function. This can be a queued message, or in our case, an API gateway request.
AWS API Gateway
An API gateway provides a moat around your application services. It can log user activity, authenticate requests and enforce usage policies (like rate limiting). (The AWS API Gateway docs are a good reference.)
AWS Cognito
AWS Cognito is a user management, authentication, and access control service. Unfortunately, all the features and configuration can be confusing at times. (As if security and authentication were ever easy. ? ) We will focus on the core elements of Cognito for securing our API.
Application and Environment Setup
The recipe for our demo application is:
- In AWS Cognito, create a User Pool (with a client application) and a Federated Identity Pool.
- In AWS API Gateway, create a usage plan and API key
- Using Claudia JS, build and deploy a simple AWS Lambda-based API.
- Update AWS IAM role to grant authenticated users access to protected API methods
- Create a single page app (SPA) using
create-react-app. It will use AWS Cognito and makes signed (and authenticated) API requests
The detailed AWS setup is in aws-setup.md, in the demo GitHub repo. We’ll highlight aspects of the setup and explain things work.
AWS Cognito
User Pool, Client Application, and Domain Name
We’ll create a User Pool with the defaults. Details and screenshots:
Federated Identity Pool
It may be a little confusing that we need both a User Pool and a Federated Identity Pool. Ashan Fernando has a pretty good explanation in this post. Put simply,
- User Pools provide access for a user to an application. This is like services such as Auth0.
- A Federated Identity Pool provides access to AWS resources.
By combining the two pools, our application can authenticate a user and AWS will assign temporary credentials. These credentials allow the user to access AWS resources. The IAM role, configured in the Identity Pool, specifies the privileges for the temporary credentials.
The detailed Federated Identity Pool setup is here.
AWS API Gateway
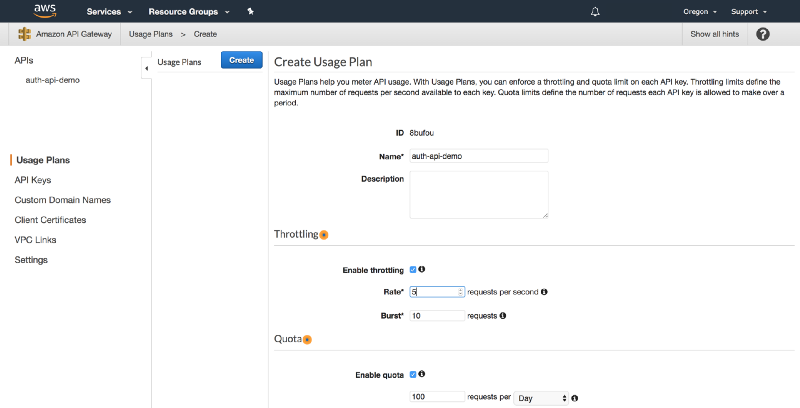
I suggest creating a usage plan for our API. While not a requirement, it is a good practice, as AWS costs can “run away” if you aren’t careful. We will create a Usage Plan, named api-auth-demo and set a throttle and burst rate, and a daily quota for API calls. We will also create an API key, which the web client application will use. (Full setup details are here.)
We’ve finished the bulk of our AWS setup. We will now write our Lambda functions and then build our React web application.
AWS Lambda and Claudia JS
We will write our Lambda functions using Node.js. Claudia.js will deploy our Lambdas and configure the API Gateway. (As a note, the Serverless framework provides similar functionality.)
We only need a simple API for our example. We’ll create two API methods (i.e. very simple microservices): one for authenticated users and one for guests.
We’ll use the Claudia API Builder, which lets multiple routes map to a single lambda. The routing mechanism is similar to routing in frameworks such as Express.js.
const ApiBuilder = require("claudia-api-builder");
const api = new ApiBuilder();

api.get("/no-auth",request => {
    return {message: "Open for All!"};
  },
  { apiKeyRequired: true }
);

api.get("/require-auth", request => {
    return {message: "You're past the velvet rope!"};
  },
  { apiKeyRequired: true, authorizationType: "AWS_IAM" }
);

module.exports = api;
view rawapi.js hosted with ❤ by GitHub
We’ll use the Claudia.js command line to deploy the API to AWS.
claudia create --region us-west-2 --api-module api --name auth-api-demoNOTE: Any changes to api.js will need to be re-deployed. Useclaudia update...
API Keys and Auth
In api.js, {apiKeyRequired: true} indicates that API requests require an API key. {authorizationType: 'AWS_IAM'} configures the API Gateway to authorize using AWS IAM. The underlying authentication mechanism is not obvious. The AWS docs outline the approach, but a summary is:
- when a user signs in, Cognito will issue tokens for temporary credentials (obtained via STS).
- for protected resources, the application needs to sign requests using these credentials
- AWS decodes and verifies the signature
- if the signature is valid, the API Gateway dispatches the request
There are other authorization methods available. The Claudia.js docs outline how to specify other methods. (The corresponding AWS docs are here.)
AWS IAM Roles for Authenticated Users
We need to edit the privileges for the IAM roles for authenticated users. We need to allow invoking the API Gateway method we created.
We need the ARN of the API Gateway. Go to the API Gateway console and find the API Gateway resource/method.
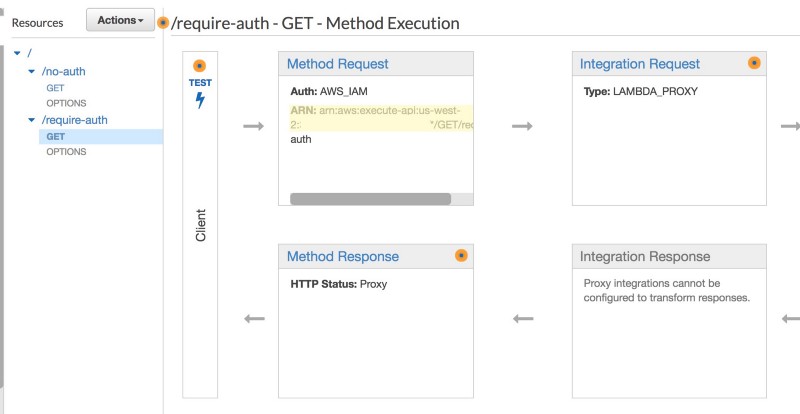
- Copy the ARN
- Go to the IAM console and find the Authenticated role created during the Cognito Federated Identity Pool setup
- add an Inline Policy as below
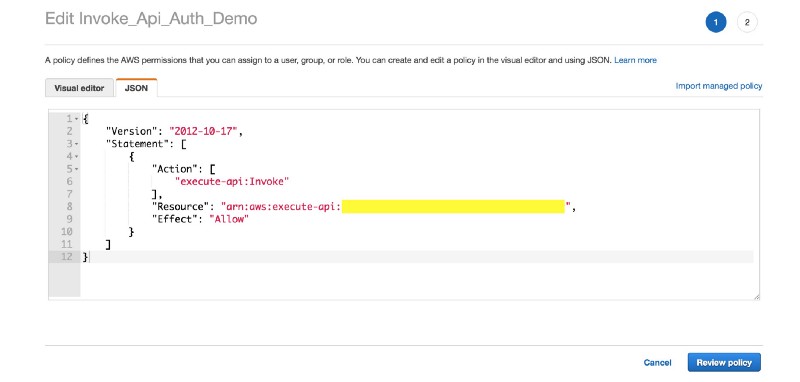
- Specify the copied ARN for the API Gateway resource in the policy.
Authenticated users can now invoke our protected API methods.
Service to Service Access Control
The Cognito setup will allow a user to invoke an API method. But this method invocation is a trigger for a Lambda function. The Lambda function executes within the context of a different IAM role. It is no longer a direct user request, but an AWS service to service interaction. IAM roles provide access control for this interaction.
Claudia.JS created the IAM role for the Lambda function. (You can also manually create this role and specify its identifier to Claudia.JS via the --role parameter. Details are here.)
If our Lambda function needs access to other AWS resources, we will need to update the Lambda’s IAM role and provide these privileges. This might be an RDS database, for example.
AWS has always used IAM to configure service to service access control. It is a well developed and well-documented model. It will probably be your primary mechanism for access control between microservices (within AWS). There might be cases where you need to augment or replace it, but I would start with IAM.
We can now build the web application for our users.
React Web Application
I am going to build a React single page web application (SPA). A Vue.js or Angular application would work too. For the client application, there are two significant components: AWS Amplify and the aws4 module.
AWS Amplify provides easy integration with AWS Cognito. aws4 is a popular library for signing AWS requests using AWS Request Signatures Version 4. AWS used signed requests for protected resources (i.e. authorized user requests).
Returning to the web client, we’ll use create-react-app. I won't outline the steps, as they are well documented on the create-react-app home page, and there are numerous online tutorials. (I've even written a few. )
For authentication, we need to do some state management. The example application doesn’t use any framework, but in a real application I’d suggest Mobx (or Redux.)
In the demo application, auth-store.js manages the user authentication state. This consists of the user's authentication state and credentials. These are used to
- render different components and styles for authenticated vs. guest user
- sign requests for protected API methods
While AWS Amplify manages much of the AWS Cognito integration, there is some work for us to do.
Determining Auth State from AWS Amplify
AWS Amplify’s documentation is good in some areas and deficient in others. I suggest reading the Authentication section of the Amplify documentation. This describes theAuth component, which interacts with Cognito.
However, there are still some aspects that the documentation doesn’t clearly address. AWS Amplify doesn’t make it easy to know the authentication state. (A discussion of this complexity is here.) Amplify configures itself asynchronously, without a callback. But there is an aws-amplify class that can help.
The Hub class in the aws-amplify module behaves like an event emitter. We care about two events: configured and cognitoHostedUI.
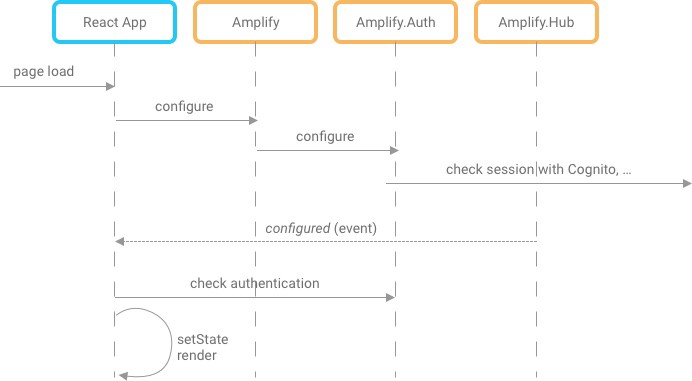
After the AWS Amplify configures the Auth component, it emits the configured event. Our application can then inquire about the current user's authentication status. This is useful when our application is being loaded, for example.
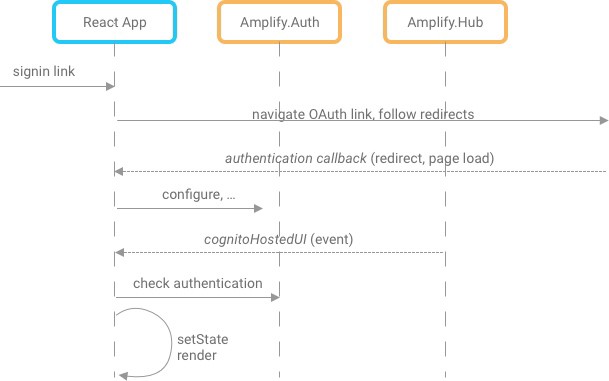
While using the application, we need to know if the authentication state changes. There is a sign-in event, but it isn't the event we want, as our demo application uses OAuth and the Cognito Hosted UI. The sign-in event is used in a custom sign-in/up screen or when using the built-in Amplify React UI. For OAuth, Amplify dispatches the cognitoHostedUI event after a completed OAuth sign-in flow.
Signing Requests
The current user will have credentials issued by AWS Cognito. These contain an access id, a secret key, and a session key. These are available by calling Auth.currentCredentials() in aws-amplify. For API methods authorized by IAM, you need to sign the request using AWS V4 Request Signatures. Thankfully, the aws4 module handles the complexities of generating these signatures.
In api-client.js,
import aws4 from "aws4";

const apiHost = process.env.REACT_APP_API_HOST;
const apiKey = process.env.REACT_APP_API_KEY;
const region = process.env.REACT_APP_REGION;

export async function authenticatedCall(authStore) {
  const opts = {
    method: "GET",
    service: "execute-api",
    region: region,
    path: "/latest/require-auth",
    host: apiHost,
    headers: { "x-api-key": apiKey },
    url: `https://${apiHost}/latest/require-auth`
  };
  const credentials = await authStore.getCredentials();
  const { accessKeyId, secretAccessKey, sessionToken } = credentials;
  const request = aws4.sign(opts, {
    accessKeyId,
    secretAccessKey,
    sessionToken
  });
  delete request.headers.Host;
  const response = await fetch(opts.url, {
    headers: request.headers
  });
  if (response.ok) {
    return await response.json();
  } else return { message: response.statusText };
}

export async function noAuthCall(authStore) {
  const response = await fetch(`https://${apiHost}/latest/no-auth`, {
    headers: { "x-api-key": apiKey }
  });
  return await response.json();
}
view rawapi-client.js hosted with ❤ by GitHub
Demo
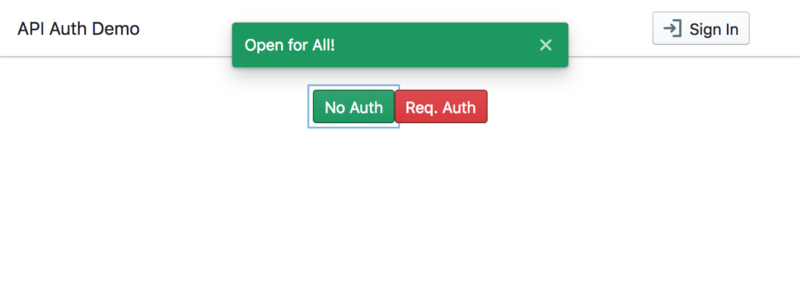
We can finally run npm start and run the app! When we first arrive at the application, we are a guest (unauthenticated user). You can also go to https://auth-api-demo.firebaseapp.com/ to try it out.
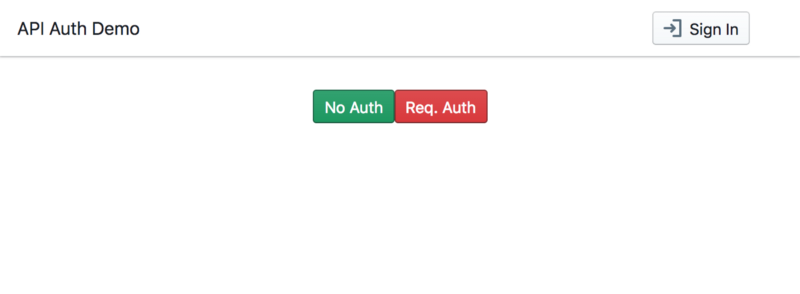
We can access unprotected methods.
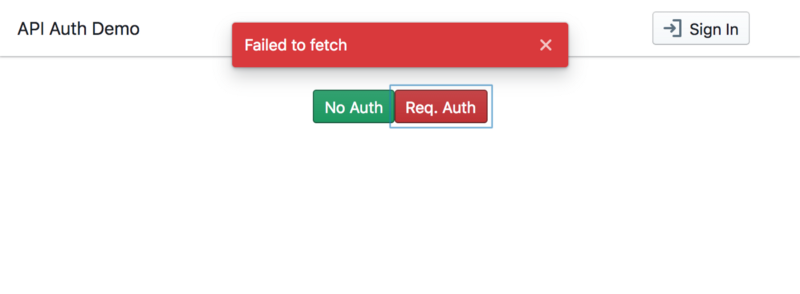
But if we try to access a protected resource, it will fail.
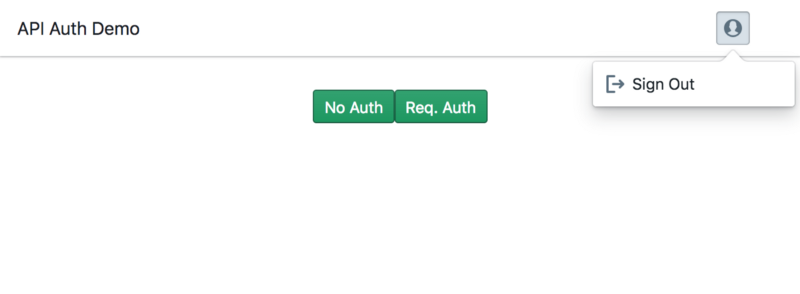
But if we sign in, we can access the protected resources.
Click Sign In and use demouser with password of demoPASS123.
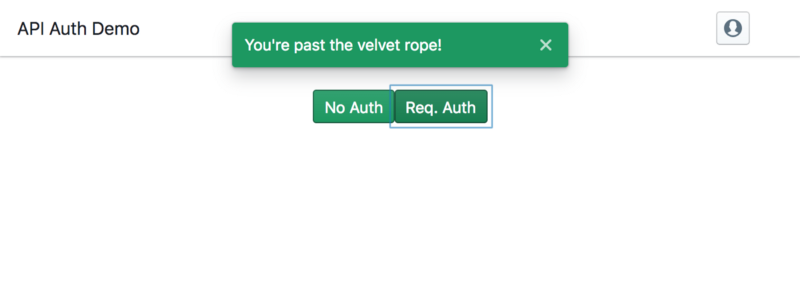
We can now click the Req. Auth button to access a protected API method.
Whew! We had to configure multiple services and digest a lot of information. But we now have an application that is a model for authenticating microservices on AWS.

Now What?
This article’s approach is “all-in” on AWS. This was a deliberate choice, to show how the various AWS pieces fit together to solve a common need, namely auth. There are alternatives to methods in this article, and I outline a few here.
And for those who stayed with me to the end, I have some parting gifts.
- In the demo repo, there is a script for automating the AWS setup. Its README has the details for running it.
resources-cheatsheet.mdhas the specific links for relevant AWS, Claudia.js, etc. documentation.
Thanks for reading!