AWS Compute Blog
Building custom connectors using the Amazon AppFlow Custom Connector SDK
This post is written by Kamen Sharlandjiev, Sr. Specialist SA, Integration, Ray Jang, Principal PMT, Amazon AppFlow, and Dhiraj Mahapatro, Sr. Specialist SA, Serverless.
Amazon AppFlow is a fully managed integration service that enables you to transfer data securely between software as a service (SaaS) applications like Salesforce, SAP, Zendesk, Slack, ServiceNow, and AWS services like Amazon S3 and Amazon Redshift. Amazon AppFlow lets you run enterprise-scale data flows on a schedule, in response to business events, or on-demand.

Amazon AppFlow is a managed integration service that replaces the heavy-lifting of developing, maintaining, and updating connectors. It supports bidirectional integration between external SaaS applications and AWS services.
The Custom Connector Software Development Kit (SDK) now makes it easier to integrate with private API endpoints, proprietary applications, or other cloud services. It provides access to all available managed integrations and the ability to build your own custom integration as part of the integrated experience. The SDK is open-source and available for Java or Python.
You can deploy custom connectors built with the SDK in different ways:
- Private – The connector is available only inside the AWS account where deployed.
- Shared – The connector can be shared for use with other AWS accounts.
- Public – Publish connectors on the AWS Marketplace for free or charge a subscription fee. For more information, refer to Sharing AppFlow connectors via AWS Marketplace.
Overview
This blog takes you through building and deploying your own Amazon AppFlow Custom Connector using the Java SDK. The sample application shows how to build your first custom connector with Amazon AppFlow.

The process of building, deploying, and using a custom connector is:
- Create a custom connector as an AWS Lambda function using the Amazon AppFlow Custom Connector SDK.
- Deploy the custom connector Lambda function, which provides the serverless compute for the connector.
- Lambda function integrates with a SaaS application or private API.
- Register the custom connector with Amazon AppFlow.
- Users can now use this custom connector in the Amazon AppFlow service.
Building an Amazon AppFlow custom connector
The sample application used in this blog creates a new custom connector that implements a MySQL JDBC driver. With this connector, you can connect to a remote MySQL or MariaDB instance to read and write data.
The SDK allows you to build custom connectors and use the service’s built-in authentication support for: OAuth2, API key, and basic auth. For other use cases, such as JDBC, you must create your own custom authentication implementation.
The SDK includes the source code for an example Salesforce connector. This highlights a complete use case for a source and destination Amazon AppFlow connector using OAuth2 as authentication.
Details
There are three mandatory Java interfaces that a connector must implement:
- ConfigurationHandler.java: Defines the functionality to implement connector configurations, and credentials-related operations.
- MetadataHandler.java: Represents the functionality to implement for objects metadata.
- RecordHandler.java: Defines functionality to implement record-related CRUD operations.
Prerequisites
Ensure that the following software is installed on your workstation:
To run the sample application:
- Clone the code repository:
git clone https://github.com/aws-samples/amazon-appflow-custom-jdbc-connector.git cd amazon-appflow-custom-jdbc-connector - After cloning the sample application, visit these Java classes for more details:
- JDBCConnectorConfigurationHandler.java: A configuration handler validates credentials for the JDBC client connection, validates connector runtime settings, and describes connector configuration.
- JDBCConnectorMetadataHandler.java: A metadata handler describes and lists all entities for the JDBC connector metadata
- JDBCConnectorRecordsHandler.java: A record handler that defines how to implement CRUD operations for this JDBC connector
To add JDBC clients for other database engines, implement JDBCClient.java interface. The custom connector uses a Lambda function as a POJO class to handle requests. The SDK provides an abstract BaseLambdaConnectorHandler class that, which you use as follows:
import com.amazonaws.appflow.custom.connector.lambda.handler.BaseLambdaConnectorHandler;

public class JDBCConnectorLambdaHandler extends BaseLambdaConnectorHandler {

  public JDBCConnectorLambdaHandler() {
    super(
      new JDBCConnectorMetadataHandler(),
      new JDBCConnectorRecordHandler(),
      new JDBCConnectorConfigurationHandler()
    );
  }
}
Local testing and debugging
While developing the connector specific functionality, developers require local testing capability to build and debug faster. The SDK and the example connector provides examples on testing custom connectors.
Additionally, you can experiment with JUnit and the DSL builders provided by the SDK. The JUnit test allows you to test this implementation locally by simulating an appropriate request to the Lambda functions. You can use debug points and step into the code implementation from start to end using the built-in IDE debugger. The sample application comes with example of JUnit tests that can be used with debug points.
Credentials management
Amazon AppFlow stores all sensitive information in AWS Secrets Manager. The secret is created when you create a connector profile. The secret ARN is passed in the ConnectorContext that forms part of the Lambda function’s invocation request.
To test locally:
- Mock the “CredentialsProvider” and stub out the response of GetCredentials API. Note that the CredentialProvider provides several different GetCredentials methods, depending on the authentication used.
- Create a secret in AWS Secrets Manager. Configure an IAM user with programmatic access and sufficient permissions to allow the secretsmanager:GetSecretValue action and let the CredentialsProvider call Secrets Manager locally. When you initialize a new service client without supplying any arguments, the SDK attempts to find AWS credentials by using the default credential provider chain.
For more information, read Working with AWS Credentials (SDK for Java) and Creating an IAM user with programmatic access.
Deploying the Lambda function in an AWS account
This example connector package provides an AWS Serverless Application Model (AWS SAM) template in the project folder. It describes the following resources:
- The Lambda function containing the custom connector code.
- The AWS IAM policy, allowing the function to read secrets from AWS Secrets Manager.
- The AWS Lambda policy permission allowing Amazon AppFlow to invoke the Lambda function.
The sample application’s AWS SAM template provides two resources:
AWSTemplateFormatVersion: '2010-09-09'
Transform: 'AWS::Serverless-2016-10-31'
Description: Template to deploy the lambda connector in your account.
Resources:
  ConnectorFunction:
    Type: 'AWS::Serverless::Function'
    Properties:
      Handler: "org.custom.connector.jdbc.handler.JDBCConnectorLambdaHandler::handleRequest"
      CodeUri: "./target/appflow-custom-jdbc-connector-jdbc-1.0.jar"
      Description: "AppFlow custom JDBC connector example"
      Runtime: java11
      Timeout: 30
      MemorySize: 1024
      Policies:
        Version: '2012-10-17'
        Statement:
          Effect: Allow
          Action: 'secretsmanager:GetSecretValue'
          Resource: !Sub 'arn:aws:secretsmanager:${AWS::Region}:${AWS::AccountId}:secret:appflow!${AWS::AccountId}-*'

  PolicyPermission:
    Type: 'AWS::Lambda::Permission'
    Properties:
      FunctionName: !GetAtt ConnectorFunction.Arn
      Action: lambda:InvokeFunction
      Principal: 'appflow.amazonaws.com'
      SourceAccount: !Ref 'AWS::AccountId'
      SourceArn: !Sub 'arn:aws:appflow:${AWS::Region}:${AWS::AccountId}:*'
Deploy this custom connector by using the following command from the amazon-appflow-custom-jdbc-connector base directory:
mvn package && sam deploy –-guidedOnce deployment completes, follow below steps to register and use the connector.
Registering the custom connector
There are two ways to register the custom connector.
1. Register through the AWS Management Console
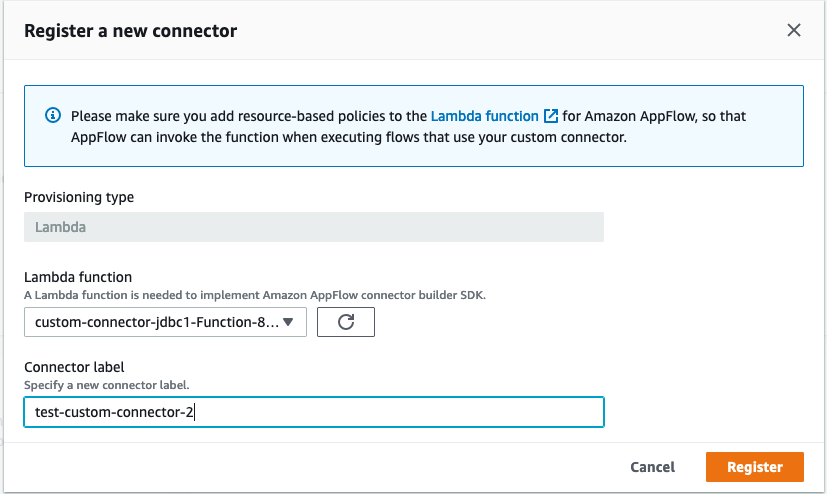
- From the AWS Management Console, navigate to Amazon AppFlow. Select Connectors on the left-side menu. Choose on the “Register New Connector” button.

- Register the connector by selecting your Lambda function and typing in the connector label.
 The newly created custom connector Lambda function appears in the list if you deployed using AWS SAM by following the steps in this tutorial. If you deployed the Lambda function manually, ensure that appropriate Lambda permissions are set, as described in the Lambda Permissions and Resource Policy section.
 - Provide a label for the connector. The label must be unique per account per Region. Choose Register.
- The connector appears in the list of custom connectors.


2. Register with the API
Invoke the registerConnector public API endpoint with the following request payload:
{
   "connectorLabel":"TestCustomConnector",
   "connectorProvisioningType":"LAMBDA",
   "connectorProvisioningConfig":{
      "lambda":{ "lambdaArn":"arn:aws:lambda:<region>:<aws_account_id>:function:<lambdaFunctionName>"
      }
   }
}
For connectorLabel, use a unique label. Currently, the only supported connectorProvisioningType is LAMBDA.
Using the new custom connector
- Navigate to the Connections link from the left-menu. Select the registered connector from the drop-down.

- Choose Create Connection.

- Complete the connector-specific setup:

- Proceed with creating a flow and selecting your new connection.
- Check Lambda function’s Amazon CloudWatch Logs to troubleshoot errors, if any, during connector registration, connector profile creation, and flow execution process.


Production considerations
This example is a proof of concept. To build a production-ready solution, review the non-exhaustive list of differences between sample and production-ready solutions.
If you plan to use the custom connector with high concurrency, review AWS Lambda quotas and limitations.
Cleaning up the custom connector stack
To delete the connector:
- Delete all flows in Amazon AppFlow that you created as part of this tutorial.
- Delete any connector profiles.
- Unregister the custom connector.
- To delete the stack, run the following command from the
amazon-appflow-custom-jdbc-connectorbase directory:sam delete
Conclusion
This blog post shows how to extend the Amazon AppFlow service to move data between SaaS endpoints and custom APIs. You can now build custom connectors using the Amazon AppFlow Custom Connector SDK.
Using custom connectors in Amazon AppFlow allows you to integrate siloed applications with minimal code. For example, different business units using legacy applications in an organization can now integrate their services via the Amazon AppFlow Custom Connectors SDK.
Depending on your choice of framework you can use the open source Python SDK or Java SDK from GitHub. To learn more, refer to the Custom Connector SDK Developer Guide.
For more serverless learning resources, visit Serverless Land.