AWS Developer Tools Blog
Running a Kubernetes Job in Amazon EKS on AWS Fargate Using AWS StepFunctions
In a previous AWS Blog, I shared an application orchestration process to run Amazon Elastic Container Service (Amazon ECS) Tasks on AWS Fargate using AWS Step Functions. This blog will be similar continuation but here we will be running the same application on Amazon EKS as a Kubernetes job on Fargate using StepFunctions.
Amazon EKS provides flexibility to develop many container use cases like long running jobs, web application, micro-services architecture, on-demand job execution, batch processing, machine learning applications with seamless integration in conjunction with other AWS services. Kubernetes is an open source container orchestration engine for automating deployment, scaling and management of containerized applications. The open source project is hosted by the Cloud Native Computing Foundation(CNCF). You may find more possible Kubernetes use cases here.
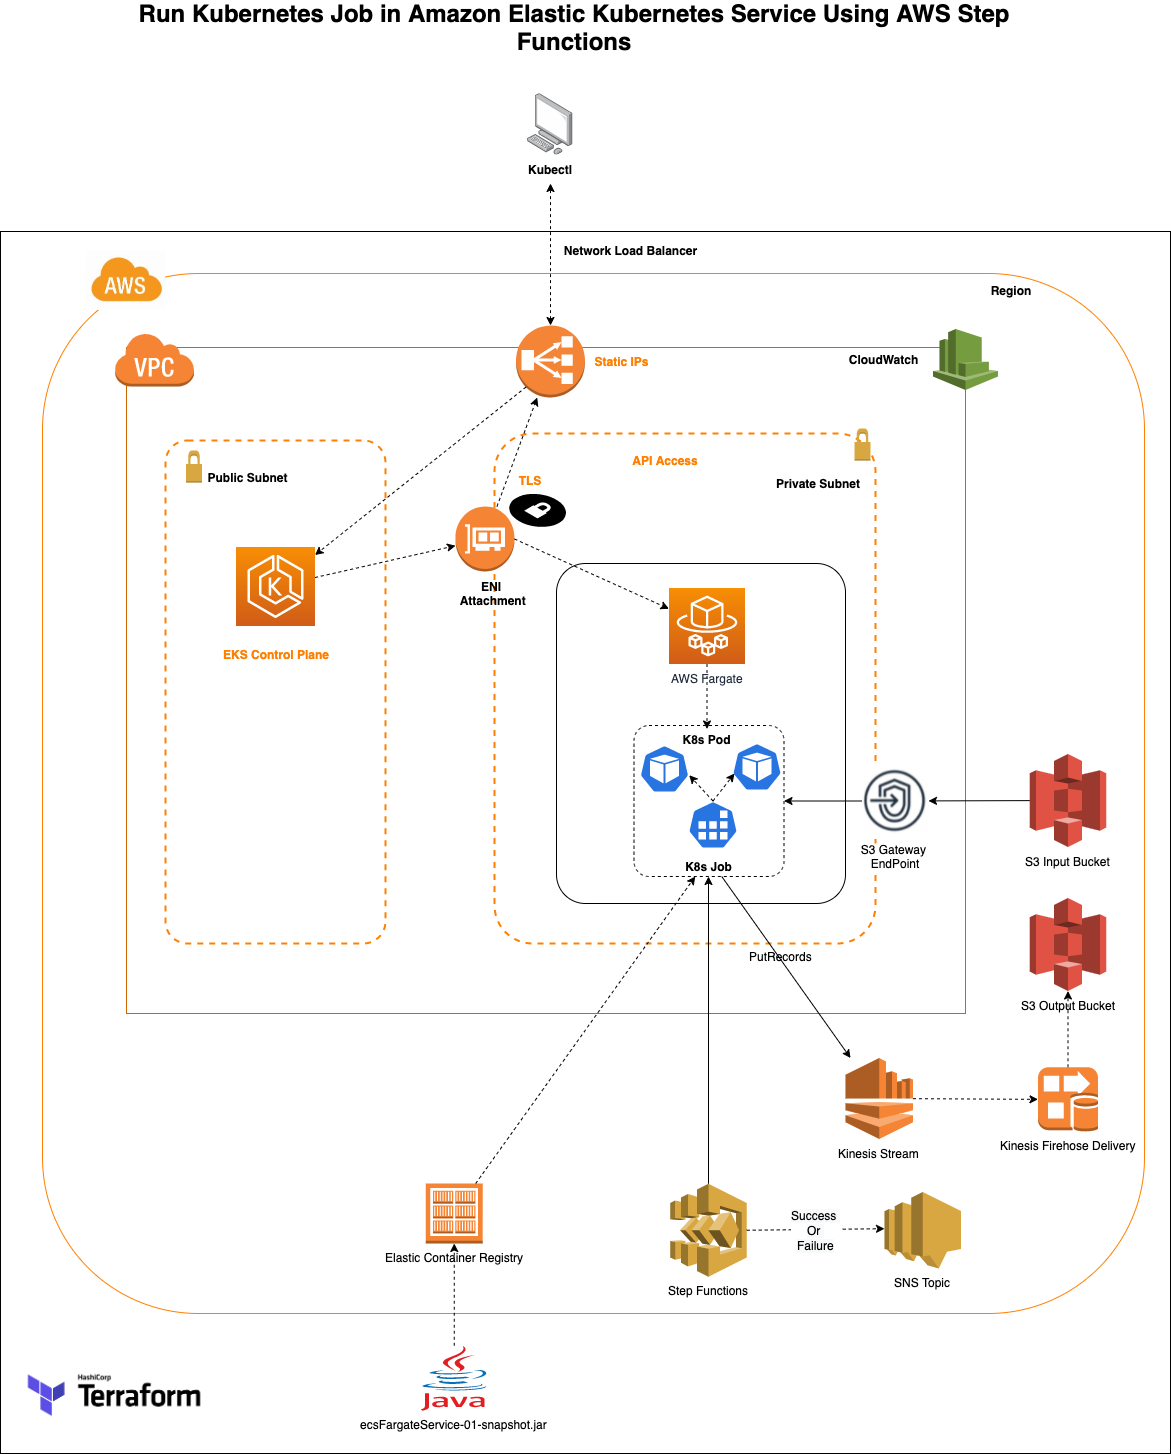
In this blog we will show how to run a Kubernetes Job using Amazon Elastic Kubernetes Service (Amazon EKS). The infrastructure used as an example in this post, is built using Terraform by HashiCorp. We will provide the Terraform infrastructure definition and the source code for the Java container application that will read and process the files present in an AWS S3 bucket. The files will be processed and pushed to an Amazon Kinesis stream. The stream is subscribed by an Amazon Data Firehose which has a target set as AWS S3 bucket. The java application is containerized using a Dockerfile and the image is stored in Amazon Elastic Container Registry (AWS ECR). AWS StepFunctions will create a Kubernetes job in which the application code is pulled from the registry and the job is executed which will process the input S3 files in a Kubernetes pod.
AWS Fargate provides serverless compute engine options for both Amazon Elastic Container Service (ECS) and Amazon Elastic Kubernetes Service (EKS). Fargate makes it easy for you to focus on building your applications and not have to worry about managing the compute resources. Fargate removes the need to provision and manage servers, lets you specify and pay for resources per application, and improves security through application isolation by design.
At a high-level, we will go through the following:
- Create a simple java application that will read contents of an Amazon S3 bucket and pushes it to Amazon Kinesis stream.
- Use HashiCorp Terraform to define the AWS infrastructure resources required for the application.
- Use terraform commands to deploy the AWS Infrastructure.
- The infrastructure will spin up an Amazon EKS Cluster using terraform-aws-eks module in a new VPC. Necessary compute, IAM role infrastructure required for the Kubernetes job execution are also built. The infrastructure also spins up AWS StepFunctions, Amazon S3, Amazon Kinesis, Amazon SNS, Amazon ECR, etc.,
- Provided execution script inserts sample S3 content files in the input bucket that are needed for the application processing.
- Navigate to AWS Console, AWS Step Functions and initiate the process. Validate the result in logs and the output in S3 bucket.
- Cleanup Script, that will clean up the AWS ECR, Amazon S3 input files and destroys all AWS resources created by the terraform
The creation of above infrastructure in your account would result in charges beyond free tier. Please see below Pricing section for each individual services’ specific details. Make sure to clean up the built infrastructure to avoid any recurring cost.
AWS services used in the solution
- Amazon Elastic Kubernetes Service (EKS), gives you the flexibility to start, run, and scale Kubernetes applications in the AWS cloud or on-premises.
- AWS Fargate is a serverless compute engine for containers that works with both Amazon Elastic Container Service (ECS) and EKS. Fargate makes it easy for you to focus on building your applications. Fargate removes the need to provision and manage servers, lets you specify and pay for resources per application, and improves security through application isolation by design.
- Amazon Kinesis makes it easy to collect, process, and analyze real-time, streaming data so you can get timely insights and react quickly to new information.
- Amazon Elastic Container Registry (ECR) is a fully managed container registry that makes it easy to store, manage, share, and deploy your container images and artifacts anywhere.
- AWS Identity and access management for Amazon EKS, IAM administrators control who can be authenticated (signed in) and authorized (have permissions) to use Amazon EKS resources. OpenID Connect (OIDC) Identity Provider (IDP) feature allows customers to integrate an OIDC identity provider with the Amazon EKS cluster running Kubernetes version 1.16 or later. With this feature, you can manage user access to your cluster by leveraging existing identity management life cycle through your OIDC identity provider.
- Additionally, you can enhance this solution with the combination of public OIDC endpoint and IRSA. Administrators and Developers can put the IAM role to a specific pod or restrict to a single IP range of the pod to provide fine grained access.
Prerequisites
The following are required to setup your development environment:
- An AWS Account.
- Make sure to have Java (11 or above) installed and running on your machine. For instructions, see Java Development Kit
- Apache Maven – Java application code is built using mvn packages
- Set up Terraform (ver 0.14). For steps, see Terraform downloads
- AWS CLI – Make sure to configure your AWS CLI (ver 2.0)
- Docker
- Install Docker based on your OS.
- Make sure the docker daemon/service is running. We will build, tag & push the application code using the provided Dockerfile to the Amazon ECR
- kubectl for running commands against the EKS cluster.
- curl – Install curl on your cli [brew install (Mac)/apt-get (linux) or chocolatey install curl (windows)]
Solution Deployment Walkthrough
At a high-level, here are the steps you will follow to get this solution up and running.
- Deploying Solution Infrastructure using Terraform.
- Manual Deployment (In case you do not use Step 1).
- Verify the Solution stack.
- Testing the Solution.
Detailed steps are provided below
1. Deploying Solution Infrastructure using Terraform
Download the code from the GitHub location.
git clone https://github.com/aws-samples/aws-stepfunctions-eks-fargate-process
Please take a moment to review the code structure as mentioned above in the walkthrough of the solution.Make sure to replace <YOUR_ACCOUNT_NUMBER>, <YOUR_REGION> (with your AWS account number and region of deployment) in the provided exec. sh script file. Also, ensure that your setup ‘aws configure’ for the same account/region. This will create the infrastructure and push the java application image to ECR. Last section in the script also creates sample/dummy input files for the source S3 bucket for the Kubenetes job.
cd aws-stepfunctions-eks-fargate-process
chmod +x exec.sh
./exec.sh
2. Manual Deployment (Only do if you did not use Step 1)
Step 1: Build java application using maven after downloading the code from github.
cd aws-stepfunctions-eks-fargate-process
mvn clean package
Step 2: Deploy the infrastructure
Execute the below variables on your terminal as they are needed for the script execution (replace the necessary values before executing)
- $ ACCOUNT_NUMBER=<Enter your AWS account number>
- $ REGION=<Enter your AWS region>
- $ INPUT_S3_BUCKET=”eks-stepfunction-dev-source-bucket”
- Bucket Name will be suffixed with your account number to make it unique.
- $ EKS_CLUSTER_NAME=”eks-stepfunction-cluster”
- $ APP_ECR_REPO_NAME=eks-stepfunction-repo
- $ APP_ECR_REPO_URL=$ACCOUNT_NUMBER.dkr.ecr.$REGION.amazonaws.com/$APP_ECR_REPO_NAME
#Execute Terraform commands for infrastructure creation
cd templates
terraform init
terraform apply --auto-approve
#Update kubeconfig with the deployed cluster
aws eks update-kubeconfig --name $EKS_CLUSTER_NAME --region $REGION
cd ..
Step 3: Steps to build and push Java application image to AWS ECR (eks-stepfunction-repo ECR repository created as part of above infrastructure steps)
#Docker build, tag and push
Note: Make sure to update your region ($REGION), ECR url (${APP_ECR_REPO_URL}) before executing the below commands
#Docker build, tag and push
$ docker build -t example/eks-stepfunction-java-app .
$ docker tag example/eks-stepfunction-java-app ${APP_ECR_REPO_URL}:latest
$ aws ecr get-login-password --region $REGION | docker login --username AWS --password-stdin
$ chmod +x exec.sh
$ docker push ${APP_ECR_REPO_URL}:latest
Step 4: Sample S3 files generation to the input bucket
Note: Make sure to update your region ($ACCOUNT_NUMBER), S3 Bucket Path (${S3_SUB_PATH}) before executing the below commands
INPUT_S3_BUCKET_PATH="s3://$INPUT_S3_BUCKET-"$ACCOUNT_NUMBER

echo "{\"productId\": $COUNTER , \"productName\": \"some Name\", \"productVersion\": \"v$COUNTER\"}" >> $FILENAME

aws s3 --region $REGION cp $FILENAME $INPUT_S3_BUCKET_PATH/$S3_SUB_PATH/
Note: exec.sh script has logic to create multiple files to validate. Above provided commands will create 1 sample file
Step 5: CoreDNS patching – Note coredns profile is created in kube-system as part of terraform. As part of the “./exec.sh” script, the coredns needs to be patched to remove the compute type
kubectl patch deployment coredns -n kube-system --type json -p='[{"op": "remove", "path": "/spec/template/metadata/annotations/eks.amazonaws.com~1compute-type"}]'
3. Stack Verification
Once the preceding Terraform commands complete successfully, take a moment to identify the major components that are deployed in AWS.
- Amazon VPC
- VPC – eks-stepfunction-vpc
- Subnets
- Public subnet – eks-stepfunction-vpc-public-us-east-1a, eks-stepfunction-vpc-public-us-east-1b, eks-stepfunction-vpc-public-us-east-1c
- Private subnet – eks-stepfunction-private-subnet1
- Internet gateway – eks-stepfunction-vpc-private-us-east-1a, eks-stepfunction-vpc-private-us-east-1b, eks-stepfunction-vpc-private-us-east-1c
- NAT Gateway – eks-stepfunction-vpc-us-east-1a
- Elastic IP – eks-stepfunction-vpc-us-east-1a
- VPC Endpoint
- AWS Step Functions
- eks-stepfunction-EKSTaskStateMachine
- Amazon EKS
- Cluster – eks-stepfunction-cluster
- Compute – Fargate Profile
- Amazon Kinesis
- Data Stream – eks-stepfunction-stream
- Delivery stream – eks-stepfunction-firehose-delivery-stream- notice the source (kinesis stream) and the target output S3 bucket
- S3
- eks-stepfunction-dev-source-bucket-
- eks-stepfunction-dev-target-bucket-
- Amazon ECR
- eks-stepfunction-repo – Make sure to check if the repository has the code/image
- Amazon SNS
- eks-stepfunction-SNSTopic – Note this is not subscribed to any endpoint. You may do so subscribing to your email Id, text message etc., using AWS Console, API or CLI.
- CloudWatch – Log Groups
- eks-stepfunction-cloudwatch-log-group
4. Testing
Let’s test our solution:
- Login to AWS Console and navigate to Steps Functions.
- Click on “eks-stepfunction-EKSTaskStateMachine”.
- Click on “Start Execution” and view the process execution (sample screenshot given below).
- You can also view the execution status of the job using kubectl commands.
kubectl -n s3-handler-ns get jobs
kubectl -n s3-handler-ns get pods
kubectl -n s3-handler-ns describe pod <pod_name>
kubectl -n s3-handler-ns logs -f <pod_name>
To verify the output:
- Navigate to the output S3 bucket – eks-stepfunction-dev-target-bucket- to see the output.
Note there could be a delay for the files to be processed by Amazon Kinesis, Kinesis Firehose to S3

Troubleshooting
- Stack Deployment failure: Review the AWS Account number and AW Region used (as part of exec.sh or manual commands) are the same as that of credentials/region configured using “aws configure”. Doing otherwise will result in mismatch of infrastructure deployment and failure of dependencies.
- Java errors: Make sure to have JDK, maven installed for the compilation of the application code.
- Check if local Docker is running.
- VPC – Check VPC quota/limits. Current limit is 5 per region
- ECR Deployment – CLI V2 is used at this point. Refer aws cli v1 vs cli 2 for issues
- Issues with running the installation/shell script
- Windows users – Shell scripts by default opens in a new window and closes once done. To see the execution you can paste the script contents in a windows CMD and shall execute sequentially
- If you are deploying through the provided installation/cleanup scripts, make sure to have “chmod +x exec.sh” or “chmod +777 exec.sh” (Elevate the execution permission of the scripts)
- Linux Users – Permission issues could arise if you are not running as root user. you may have to “sudo su“ .
- If you are running the steps manually, refer the “exec.sh” script for any difference in the command execution
Pricing
- VPC, NAT Gateway pricing – https://aws.amazon.com/vpc/pricing/
- EKS – https://aws.amazon.com/eks/pricing/
- VPC Private link pricing – https://aws.amazon.com/privatelink/pricing/
- Amazon Kinesis Data Streams – https://aws.amazon.com/kinesis/data-streams/pricing/
- Amazon Kinesis Data Firehose – https://aws.amazon.com/kinesis/data-firehose/pricing/
- Amazon S3 – https://aws.amazon.com/s3/pricing/
Cleanup
Terraform destroy command will delete all the infrastructure that were planned and applied. Since the S3 will have both sample input and the processed files generated, make sure to delete the files before initiating the destroy command. This can be done either in AWS Console or using AWS CLI (commands provided). See both options below
Using the cleanup script provided
- Cleanup.sh
- Make sure to provide
- chmod +x cleanup.sh
- ./cleanup.sh
Note: Destroying “coredns” and fargate profile can take longer. Deletion of those are a prerequisite for deleting the EKS cluster which in turn are needed for the actual private subnets and VPC deletion. Terraform destroy may time out occasionally , when this happens make sure to run the cleanup script again. Make sure to cleanup your entire VPC infrastructure that was built so as to delete EKS Cluster, ENI, VPC Endpoint, etc., to avoid any recurring charges.
Manual Cleanup – Only do if you didn’t do the above step
- Clean up resources from the AWS Console
- Open AWS Console, select S3
- Navigate to the bucket created as part of the stack
- Delete the S3 bucket manually
- Similarly navigate to “ECR”, select the create repository – eks-stepfunction-repo you may have more than one image pushed to the repository depending on changes (if any) done to your java code
- Select all the images and delete the images pushed
- Clean up resources using AWS CLI
# CLI Commands to delete the S3, ECR and destroy Infrastructure created by terraform
aws s3 rb s3://eks-stepfunction-dev-source-bucket-<your-account-number> --force
aws s3 rb s3://eks-stepfunction-dev-target-bucket-<your-account-number> --force
aws ecr batch-delete-image --repository-name eks-stepfunction-repo --image-ids imageTag=latest
aws ecr batch-delete-image --repository-name eks-stepfunction-repo --image-ids imageTag=untagged
cd templates
terraform destroy –-auto-approve
Conclusion
You were able to launch an application process involving Amazon EKS and AWS Fargate which integrated with various AWS services. The blog post walked through deploying an application code packaged with Java using maven. You may use any combination of applicable programming languages to build your application logic. The sample provided has a Java code that is packaged using Dockerfile into the Amazon ECR.
We encourage you to try this example and see for yourself how this overall application design works within AWS. Then, it will just be a matter of replacing your current application, package them as Docker containers and let Amazon EKS manage the application efficiently.
If you have any questions/feedback about this blog please provide your comments below!
References
- Amazon EKS Faqs
- AWS EKS Best Practices
- Containers on AWS
- AWS Fargate Faqs
- Amazon Kinesis
- Docker Containers
- Kubernetes
- Terraform: Beyond the basics with AWS
- VPC Endpoints
- Terraform by HashiCorp
About the Authors
 Sivasubramanian Ramani (Siva Ramani) is a Sr Cloud Application Architect at AWS. His expertise is in application optimization, serverless solutions and using Microsoft application workloads with AWS.
 Naveen Balaraman is a Cloud Application Architect at Amazon Web Services. He is passionate about Containers, Serverless Applications, Architecting Microservices and helping customers leverage the power of AWS cloud.