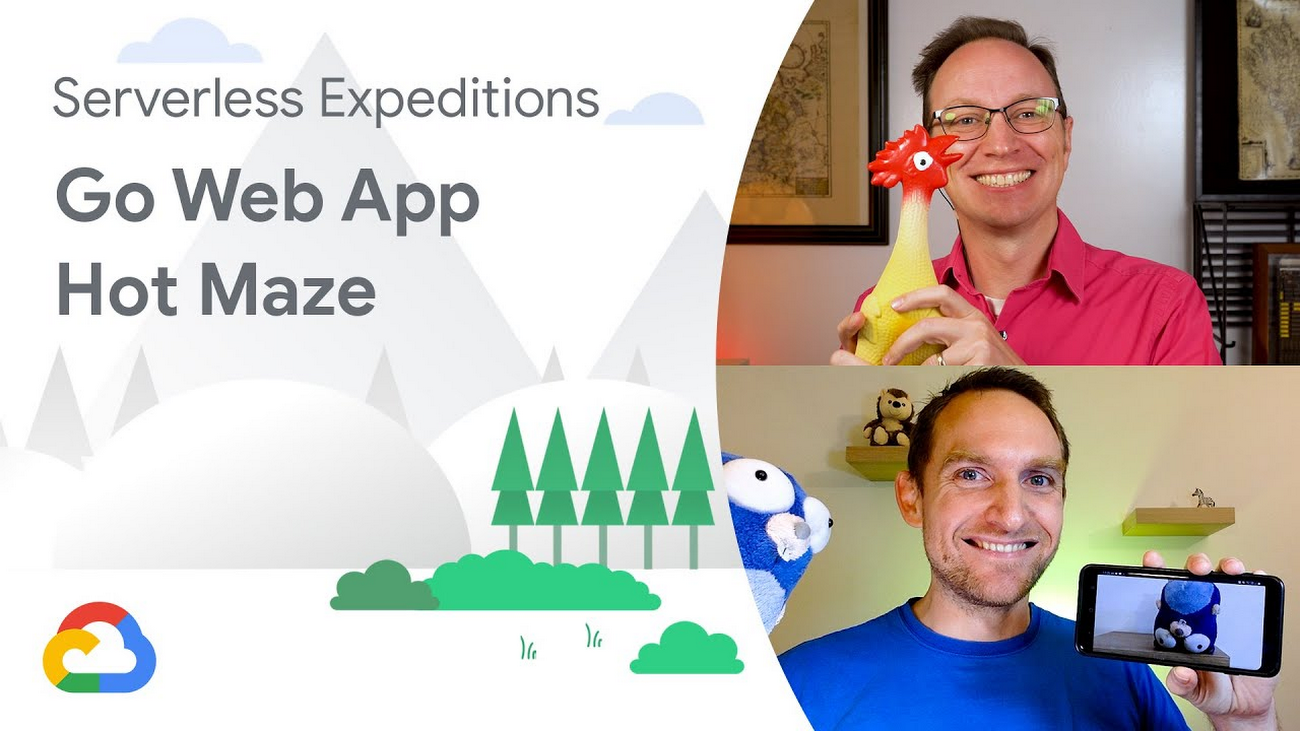
Spoiled for choice: Deploying to 3 serverless platforms
Valentin Deleplace
Developer Advocate
I made a webapp called Hot Maze and tried to deploy it to App Engine, to Cloud Functions, and to Cloud Run. This is what I learned in the process.
What is Hot Maze
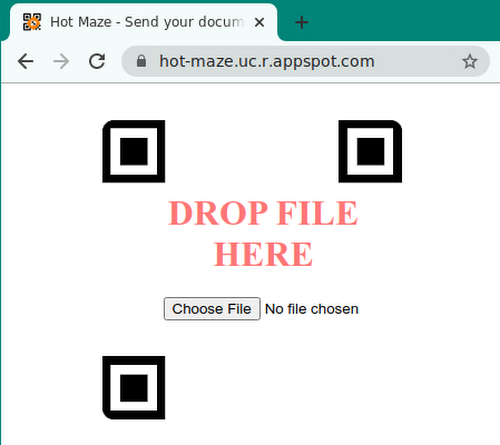
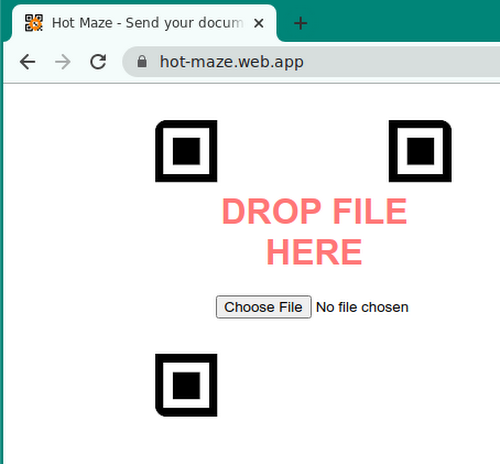
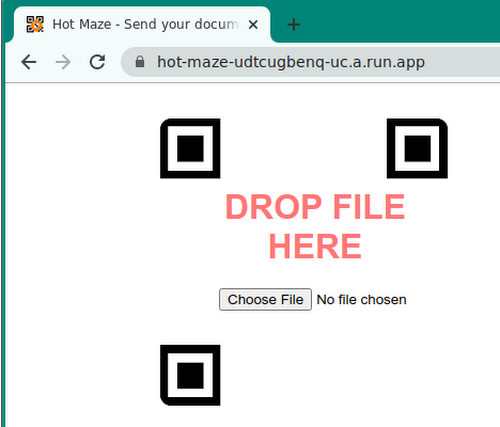
Hot Maze is a web page that lets you share a photo or a document from your computer to your phone, using a QR code.
It’s a fast, frictionless and secure way to transfer a resource, which doesn’t require any account creation or any password.
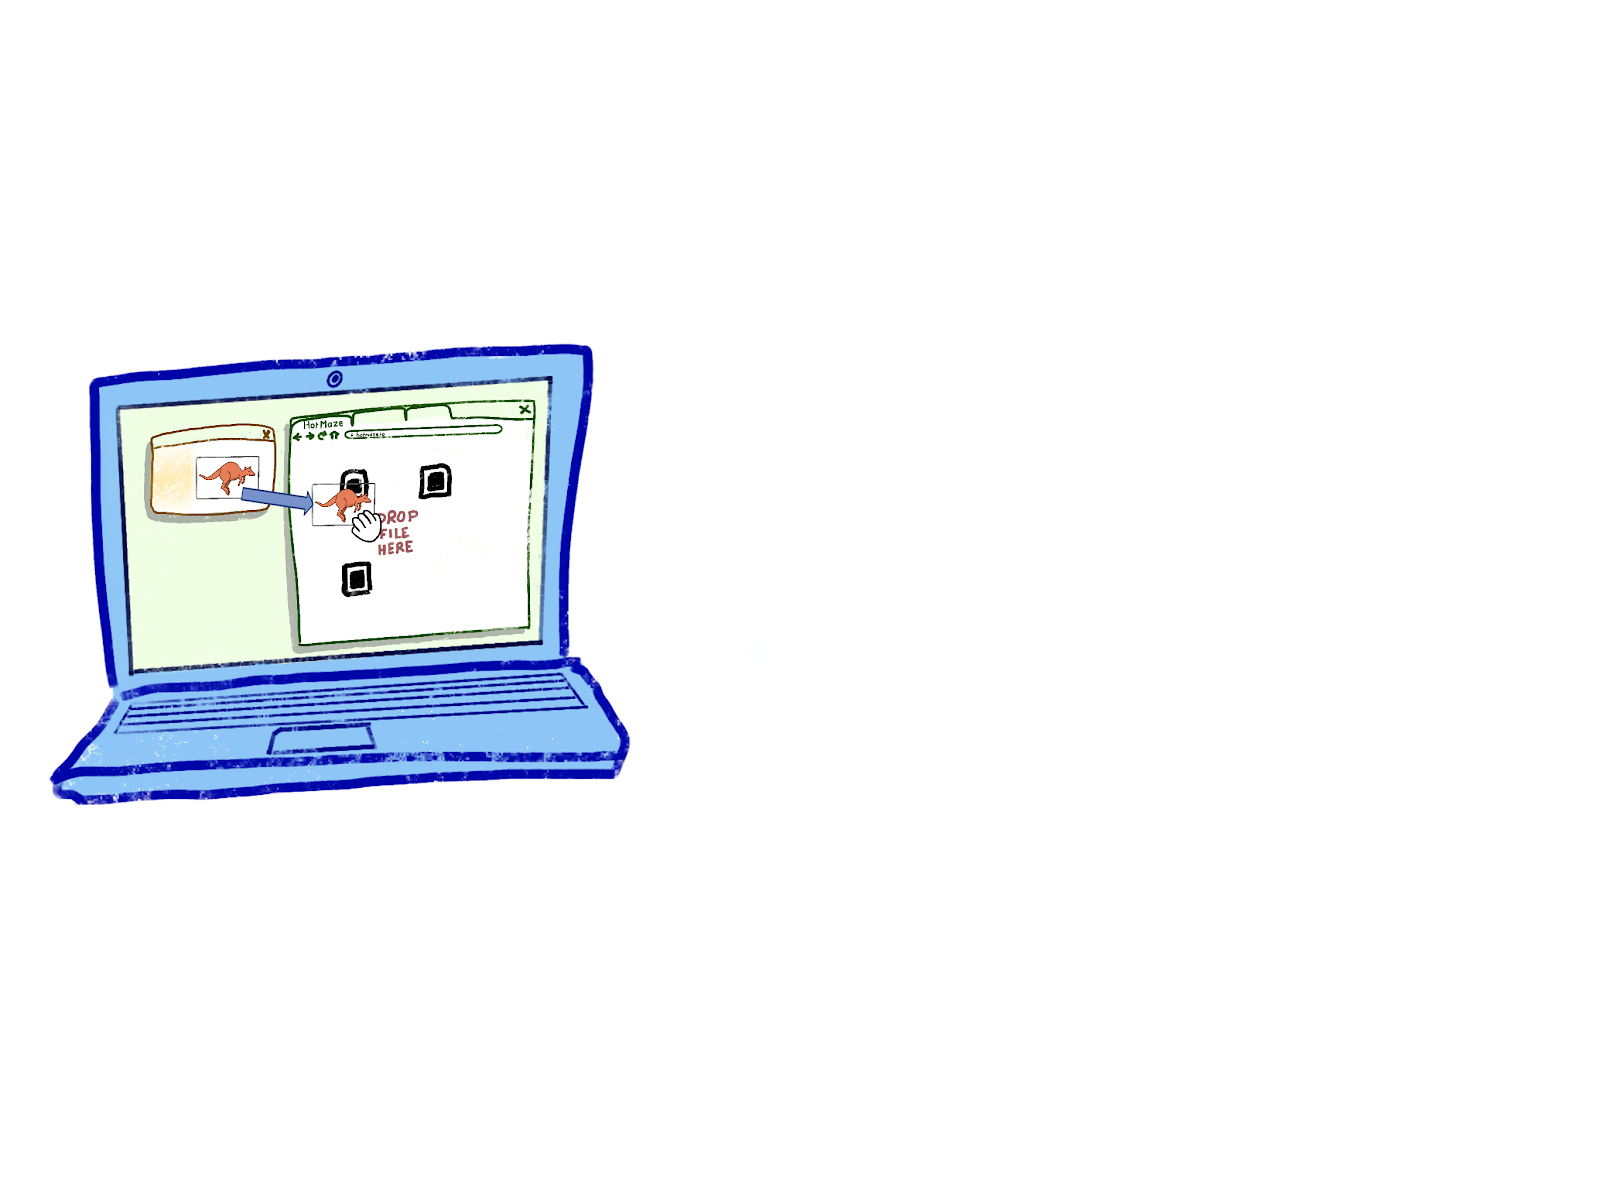
Let’s see it in action. Here, sending a blue gopher:

Conceptually, this is what happens within seconds when you drop a file (e.g. a kangaroo) to the Hot Maze web page:
Your browser uploads it to a Cloud location
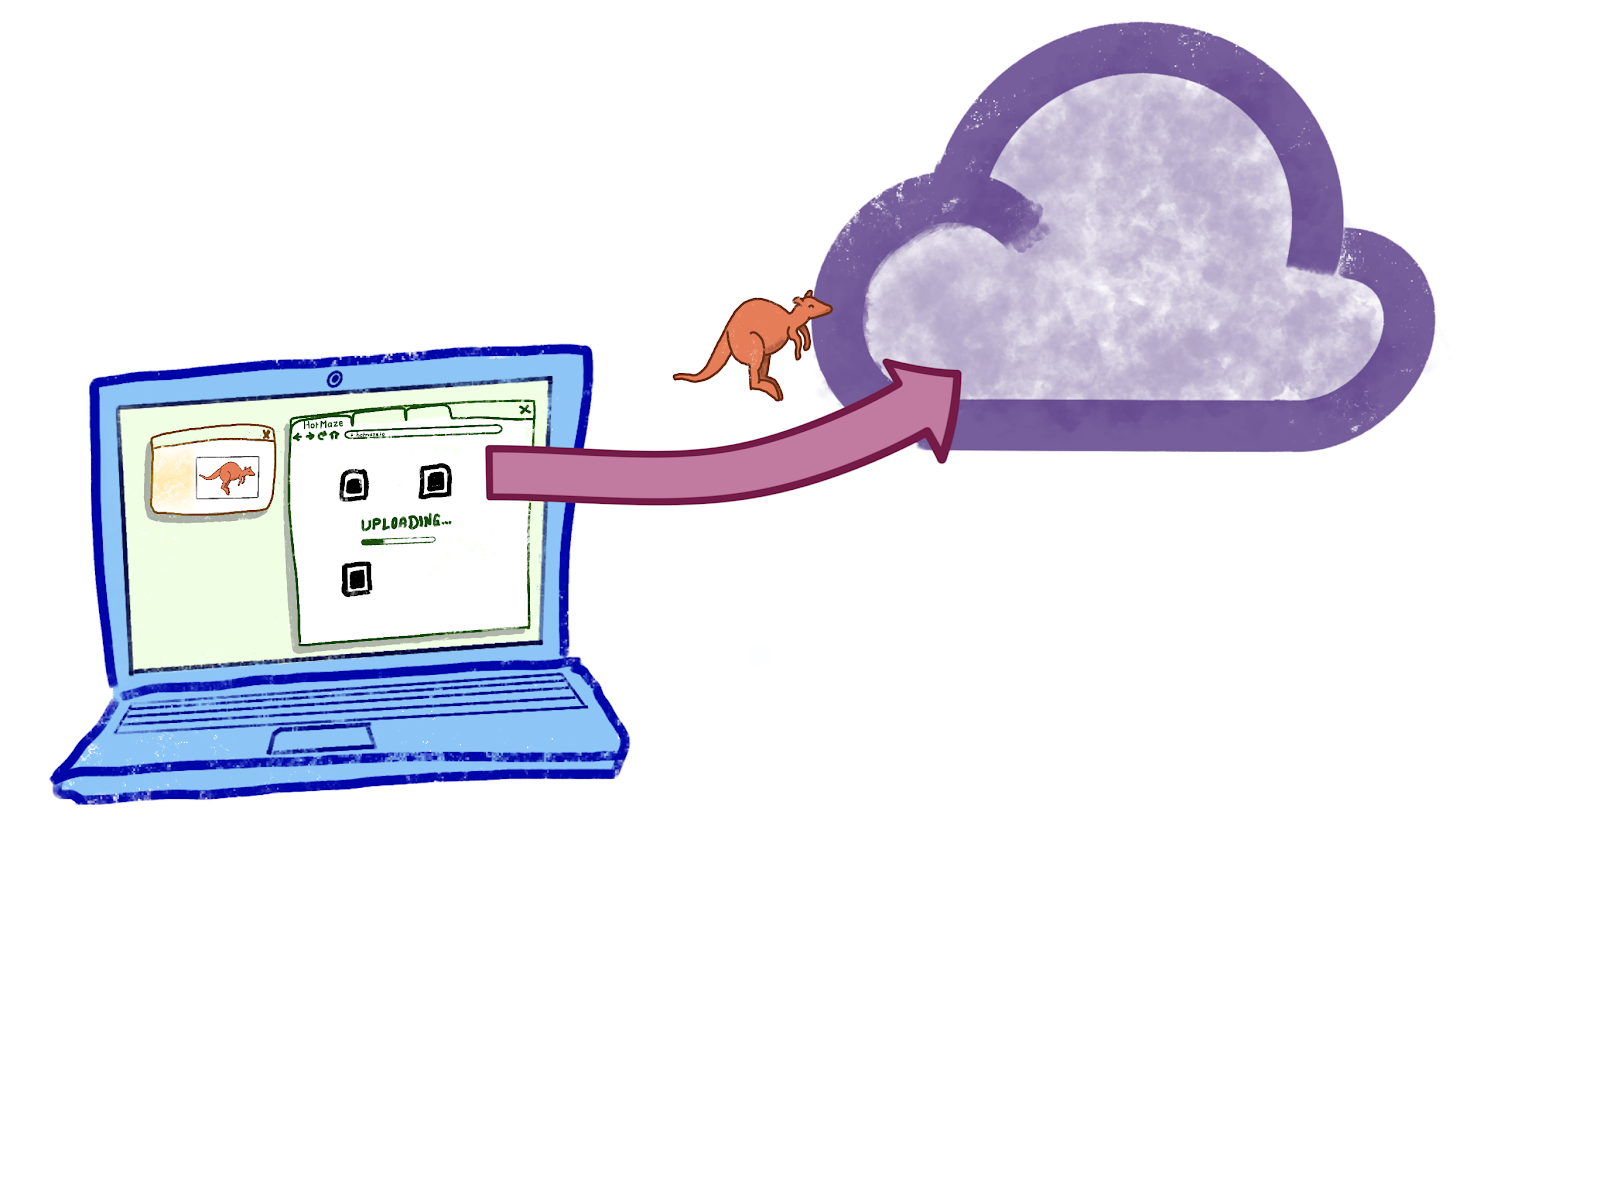
The web page displays a QR code containing a URL to the Cloud location
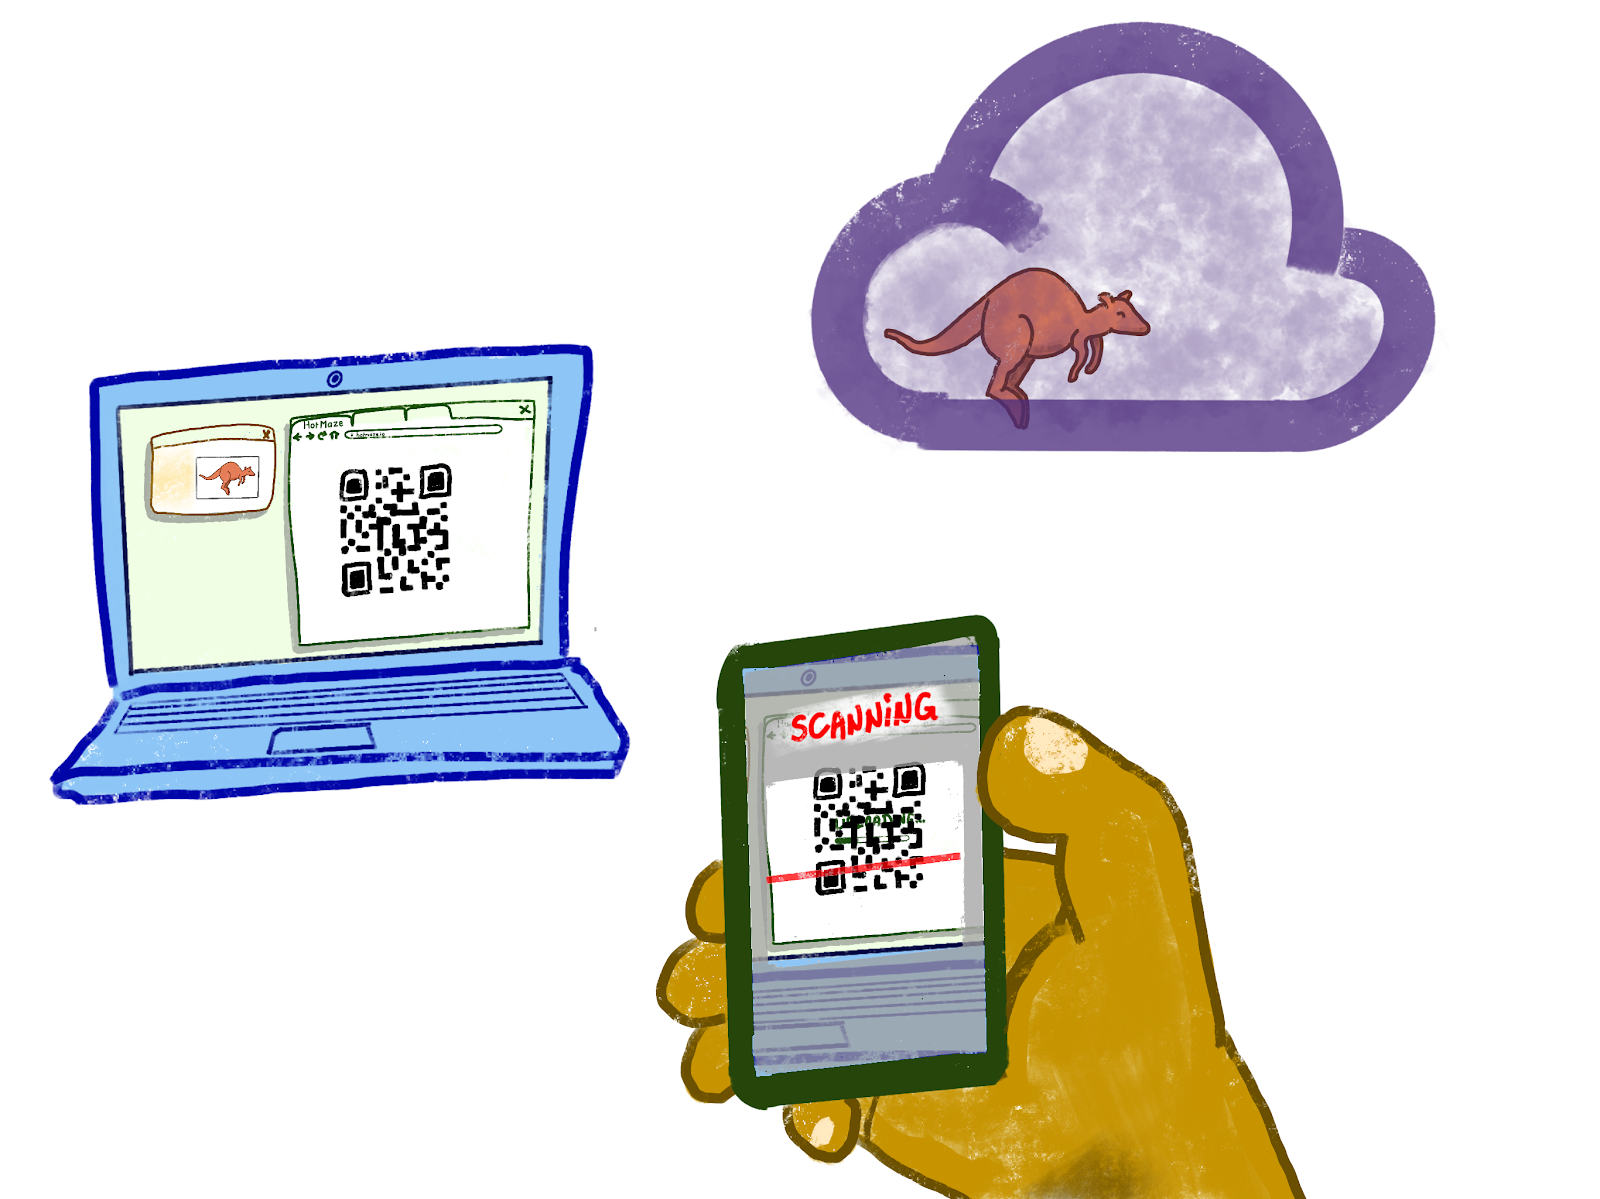
Your phone scans and decodes the QR code, and downloads the resource.

The exact request sequence would depend on the Cloud components we choose to orchestrate the file transfer. Here is a first sensible workflow using Google Cloud:
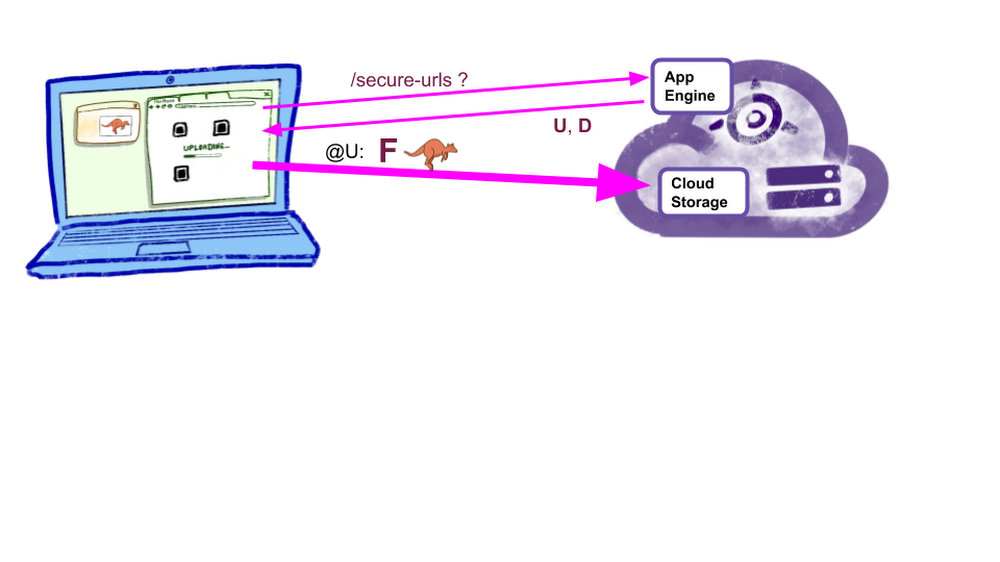
- You drop a file F
- The web page asks the Cloud server for 2 unique one-time use URLs: one URL U to upload a file to a temporary location L in Cloud Storage, and another URL D to download the file from L.
- The web page now uses U to upload F to L.
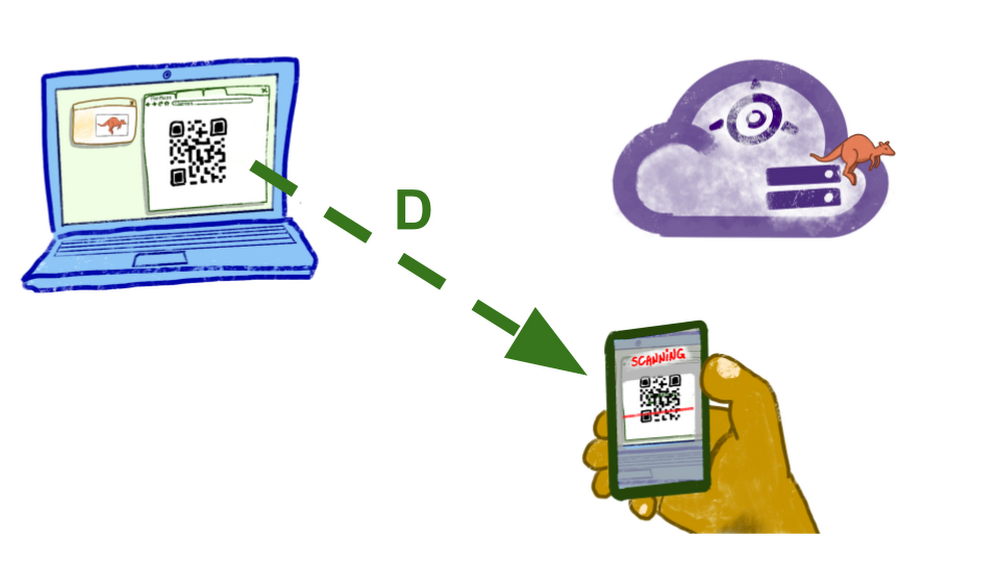
- The web page encodes D into a QR code Q and displays it.
- You scan Q with a QR code scanner mobile app.
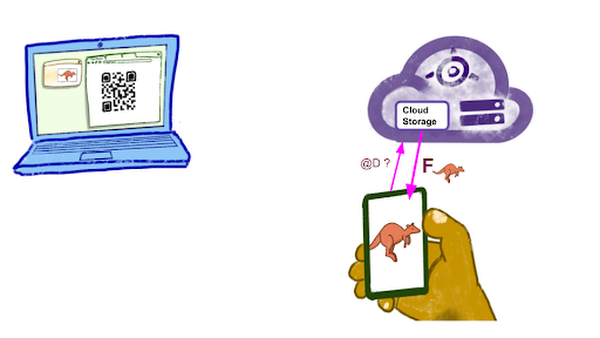
- The mobile decodes D.
- The mobile uses D to download F from L.
- A few minutes later, F is permanently deleted from L.
In this scenario, the mobile phone uses a standard QR code reader app (many choices available in the Play store and in the App Store) and then lets its default browser download the file without any extra logic on the phone side.
This scenario is secure because no one else knows the secret URLs U and D, thus no one can see your file F or tamper with it. U and D use the HTTPS protocol. The Cloud location L is not publicly accessible.
This article shows how to design the application Hot Maze and deploy it to different serverless products of Google Cloud. We’ll explore 3 alternatives: App Engine, Cloud Functions, and Cloud Run.

A word about Serverless
The three design choices discussed below have something in common: they are stateless. This means that the specific server instance that processes a given request does not hold data and is not regarded as a source of truth. This is a fundamental property of autoscaled serverless architectures. The user data (if any) lives in distinct stateful components: a database, a file storage, or a distributed memory cache.
Design for App Engine
App Engine Standard is great if your stateless application meets these criteria:
- Handles HTTP(S) requests
- Is stateless
- Is written in Go, Java, Python, Node.js, PHP, or Ruby
- Does not need to use the local filesystem or to install binary dependencies
- Communicates with other Google Cloud components

Hot Maze fits this description very well. It is written in Go, and we use Google Cloud Storage (GCS) as a temporary repository of user files. Hot Maze consists of 2 components:
- The Frontend (static assets): HTML, JS, CSS, images;
- The Backend: handlers that process the upload and download logic.
The source code is available on GitHub. In the repo, this implementation (App Engine + Cloud Storage) is called B1.
Project structure
Good news, it is simple and idiomatic to have the Go webapp serve both the Frontend and the Backend.
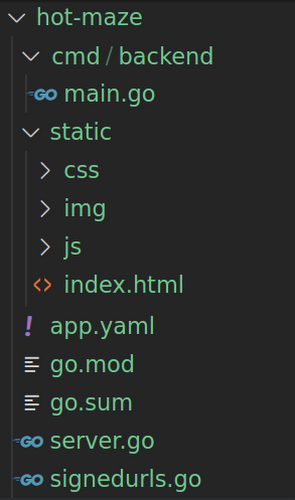
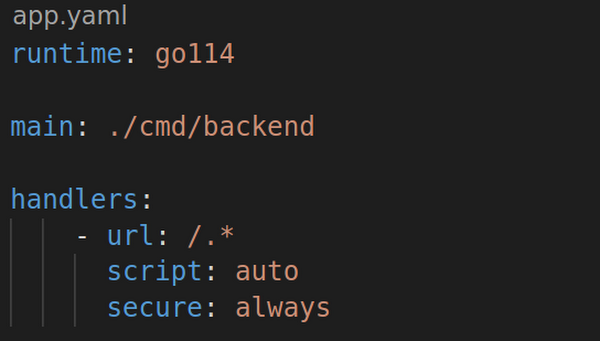
The webapp code is not adherent to App Engine (GAE), it is a standard Go app that can be developed and tested locally. Only app.yaml is specific to App Engine: It specifies which App Engine runtime to use, and how to route the incoming requests.
The webapp does not need to worry about HTTPS. The HTTPS termination happens upstream in the “Google Front End Service” (GFE), so the Go code doesn’t need to deal with certificates and encryption.
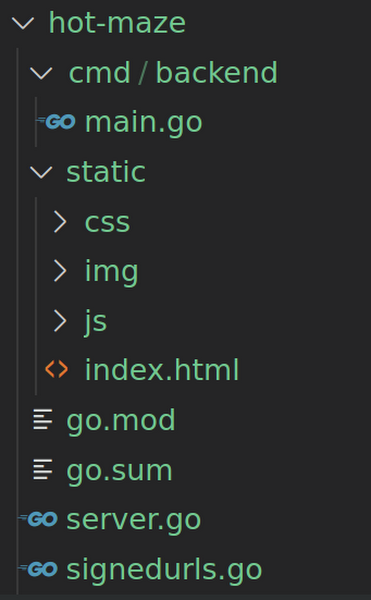
It is a good practice to code the server logic in its own package at the root of the Go module, and have a “main” package executable program inside “cmd” that instantiates the server and listens to a specific port. For example, in my first App Engine implementation of Hot Maze, "github.com/Deleplace/hot-maze/B1" is both the name of the module and the path of the server package.
Storage
I chose Cloud Storage to take care of temporary data storage, so I have a dependency to the GCS library cloud.google.com/go/storage. For security reasons (privacy), I don’t grant read and write access to a GCS bucket to anonymous internet users. Instead I’ll have my server generate Signed URLs to let an anonymous user upload and download a given file.
Flow
When a computer user drops a file to the Hot Maze web page, the first request is asking the backend to generate and return 2 URLs: one to let the browser upload the user file to GCS, and one to let the mobile phone download the file from GCS.
This is all the information needed to proceed:
- Upload the file F to the “secure upload URL” U
- Then encode and display the secure download URL D in a QR code
The download URL is sufficient to retrieve the file directly from GCS. Ideally, the mobile phone (with a QR code scanner app) would not need to communicate with the App Engine backend at all. See the section Shorter URLs below to discover why we will in fact have the mobile device hit the App Engine service.
Serving static assets
The Frontend part of the app consists of an HTML file, a JS file, a CSS file, and a few images. It may be served by the same server instances as the Backend part, or by different servers, possibly under a different domain name.
Go server
The straightforward path is to have our Go server handle all the requests to the (static) Frontend and to the (dynamic) Backend. This is how we serve all of the contents of a given folder:

This approach works exactly the same in local development and in production. Each incoming request to a static file is handled by the Go code of the server instance.
Static file handlers in app.yaml
It is also possible to declare the static assets in app.yaml.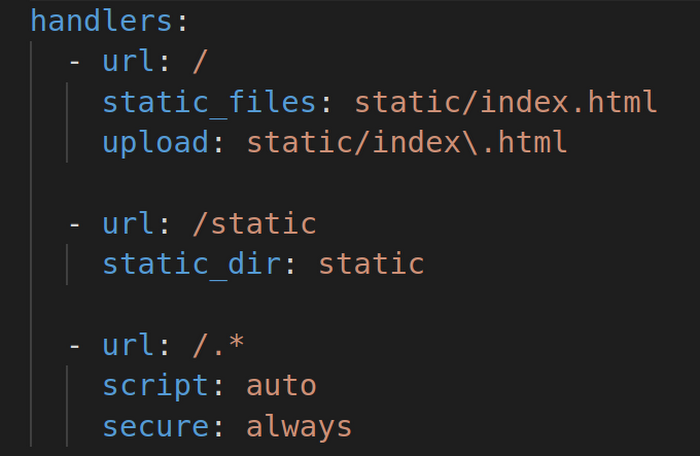
This has some advantages:
- The requests for static assets will be handled by a CDN-like file server, not from your App Engine instances;
- The static assets may be served slightly faster;
- The static assets don’t experience cold starts. They are fast even when zero instances are running.
- The request logs still show up in the Cloud Logging console.
- This may decrease the pressure on my App Engine instances, improve their throughput of dynamic requests, and decrease the total number of occurrences of cold starts (loading latency) for scaling up.
If you use this optimization, I suggest that you keep the Go handler for static files (with http.FileServer), which continues to work for local development. This is now a component that works differently in development and in production, so you will have to keep this fact in mind during QA testing, and be careful not to introduce discrepancies between the app.yaml and the Go code (e.g. the exact set of files and folders, the cache response headers, etc.).
The built-in CDN is such a nice and useful feature of App Engine that we should keep it in mind when considering the serverless options for a new project.
Shorter URLs
There’s a gotcha: Signed URLs have lengthy crypto parameters, thus are pretty long: 500+ characters.
Long URLs are fine for computers, however they’re not great for humans (if one ever needs to type it) and for QR codes.
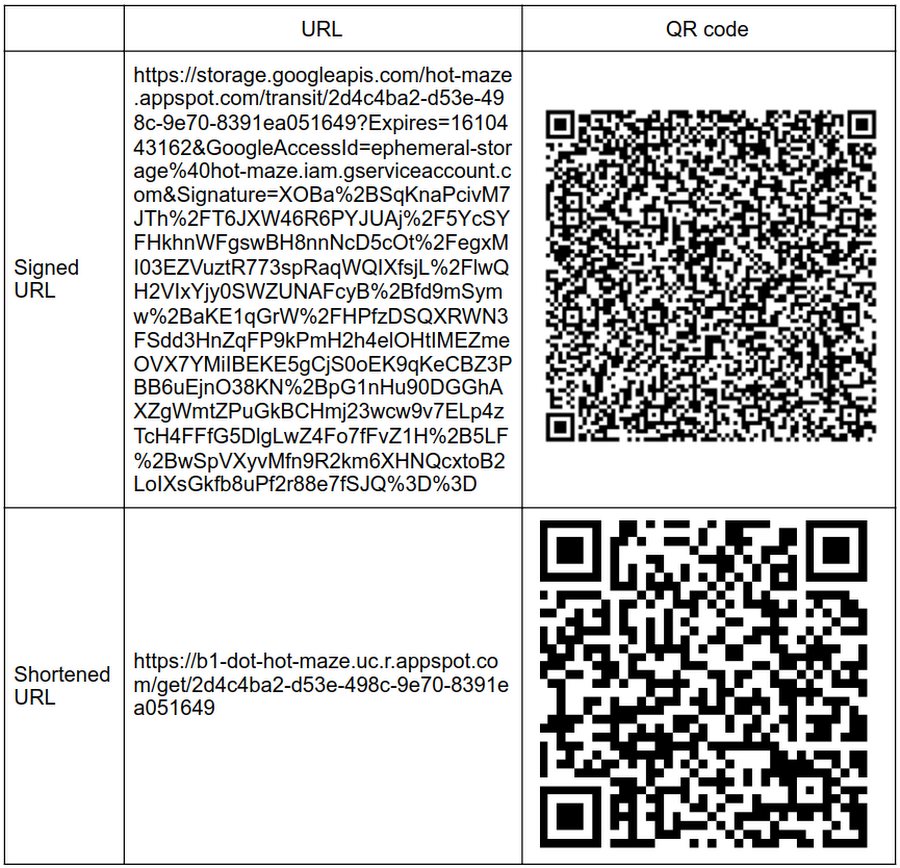
The full-length Signed URL above technically can fit in a standard QR code, but the resulting picture is so complex and full of tiny patterns that your mobile QR code scanner app will have troubles to properly read it.
The Upload URL U is used as-is in its full-length form: your browser receives it inside a JSON response, and uses it immediately in JS to upload your resource.
However, the Download URL D in full-length is not really appropriate to encode in a QR code. To fix this, we create an extra indirection: a Shortened Download URL containing only the UUID of the resource file. When the mobile device scans the QR code and extracts the short URL, it asks App Engine for the matching full-length URL to the resource in Cloud Storage.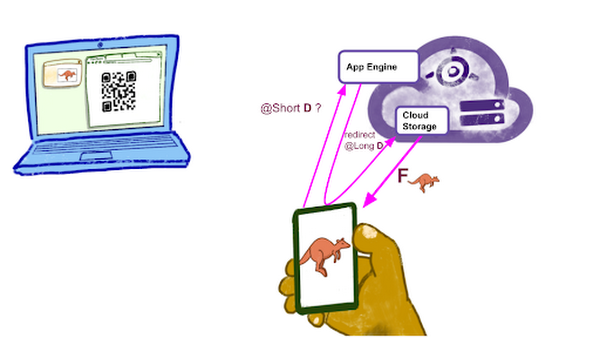
This URL shortening process adds a small delay of 1 roundtrip to the App Engine service. It also adds some (moderate) server logic, as the service needs to somehow remember the mapping between the Short D URL and the Long Signed D URL. It has the great benefit of leveraging a QR code that’s actually usable in practice.
Cleanup
We don’t need and don’t want to keep the user data more than a few minutes in the Cloud servers.
Let’s schedule its automatic deletion after 9mn with Cloud Tasks. This is done in three parts:
- Creation of a new task queue
$ gcloud tasks queues create b1-file-expiry
- A
/forgethandler that deletes a resource immediately: source - A Task object that will hit
/forget?uuid=<id>9mn after the signed URLs generation: source
A request header check ensures that the file deletion is not a public-facing service: It may only be triggered by the task queue.
The Signed URLs themselves are short-lived, so the clients may upload and download only for 5mn after URL generation. The cleanup serves other purposes:
- Reduce storage costs, by deleting obsolete data;
- Foster privacy by making sure the cloud service doesn’t hold any copy of the user data longer than necessary.
Privacy
The service doesn’t require any account creation, authentication, or password.
It is secure because user data can’t be intercepted by third parties:
- Transport encryption: upload and download use HTTPS,
- Data encryption at rest in Cloud Storage,
- Use of a nonce UUID to identify a resource, generated by the package
github.com/google/uuid, which usescrypto/rand. - Generation of secure Signed URLs that can’t be forged,
- Signed URLs expire after 5 minutes,
- User data is deleted after 9 minutes.
However, this is different from what we call “end-to-end encryption” (E2EE). The Hot Maze service owner (me) could access the GCS bucket and see the user files before they are deleted. Implementing E2EE would be an interesting project… maybe the material for a future article.
Cloud Storage bucket configuration
Even with proper Signed URLs, the web browser must still be allowed to access the specific Cloud Storage bucket. If not configured, the browser may refuse and throw
Access to XMLHttpRequest from origin has been blocked by CORS policy: Response to preflight request doesn't pass access control check: No 'Access-Control-Allow-Origin' header is present on the requested resource.
I need to explicitly configure CORS to allow all domain names that may need legit write access (PUT) to the bucket. For this I create a bucket_cors.json file:
Then I apply it with:
$ gsutil cors set bucket_cors.json gs://hot-maze.appspot.com
“hot-maze.appspot.com” looks like a domain name but here it is the name of the bucket that I use to store the temporary files.
Cloud Storage access for local development environment
Note that the JSON above includes a localhost domain. This is necessary for the development phase. It is fine to keep this configuration even after the app has been deployed to production. It does not constitute an extra security risk.
Service Accounts
It turns out that generating a GCS Signed URL with the Go client library requires a service account private key, having proper permissions. So I visited IAM, created an account ephemeral-storage@hot-maze.iam.gserviceaccount.com and gave it the role “Storage Admin”.
Now I can download and use its private key, but there’s no way I’d check in such a sensitive secret in my code repo! Instead I stored the private key in Secret Manager. Then I made sure to grant the role “Secret Manager Secret Accessor” to the App Engine default service account. That’s quite a lot of indirections! The rationale is:
- To perform a sensitive operation, the backend must be authenticated somehow, but it is not sufficient;
- Additionally it requires a private key, which is a secret;
- It is then able to generate an upload URL to be used by an anonymous user of the service;
- The App Engine backend is automatically authenticated in production;
- Now the local development environment needs to deal with an explicit service account, in order to read the secret from Secret Manager.
Local development
From folder B1:
$ export GOOGLE_APPLICATION_CREDENTIALS=/local/path/to/sa.json
$ go run github.com/Deleplace/hot-maze/B1/cmd/backend
Note that even if the main program is in cmd/backend, we run it from the root directory of the Go module, so that it correctly finds the static folder.
The service account key sa.json was downloaded from the IAM web console and stored somewhere in my local file system. It is not intended to be checked in with the source code.
Deployment
Prerequisite: I’m already authenticated in the command line tool gcloud, and my active project is hot-maze. From folder B1:
$ gcloud app deploy
This takes 2 minutes to complete. A new version is deployed as we can see in the web console. It is now accessible at two equivalent URLs:
Design for Cloud Functions
Using Cloud Functions (GCF) to process the incoming events is a lightweight option with fine granularity. GCF is appropriate to process events asynchronously or synchronously. See the source code of the B2 implementation using GCF, GCS and Firebase Hosting.
Frontend structure (static assets)
The main difference with the first option is that Cloud Functions is not a “web backend” designed to serve HTML pages and resources. For this, we’ll use Firebase Hosting. Let’s:
- run
firebase initin a frontend project folder, and follow the instructions. - store
index.htmland the static folders inside the new firebase public folder. - deploy the Frontend with
$ firebase deploy
Note: by default the assets served by Firebase have a header cache-control: max-age=3600 (one hour).
Firebase Hosting serves requests from a global CDN.
Backend structure
Another difference is that Cloud Functions written in Go are not “standard” Go web servers. To develop and test them locally, we need the Functions framework.
In the case of my app:
- It is still a good idea to have my server business logic in its “hotmaze” package at the root of the Go module
- We don’t register handlers with
http.HandleFuncanymore - For local dev, we have a main package that calls
funcframework.RegisterHTTPFunctionContextfor each exposed Function.
Note that some configuration values are now provided inside the package “hotmaze” instead of the package “main”. That’s because the executable cmd/backend/main.go will not be used in production. We don’t deploy executables or full servers to GCF. Instead, we deploy each Function separately:
$ gcloud functions deploy B2_SecureURLs \
--runtime go113 --trigger-http --allow-unauthenticated
$ gcloud functions deploy B2_Get \
--runtime go113 --trigger-http --allow-unauthenticated
$ gcloud functions deploy B2_Forget \
--runtime go113 --trigger-http --allow-unauthenticated
There are 3 deploy commands, because we have 3 dynamic handlers in the backend: one to generate secure URLs, one to redirect from a Short URL to a full-length GCS Signed URL, and one to delete a resource from GCS.
The total number of commands to deploy the full application is 4. It is possible to redeploy the Frontend only, or to redeploy only a single Function.
Local development
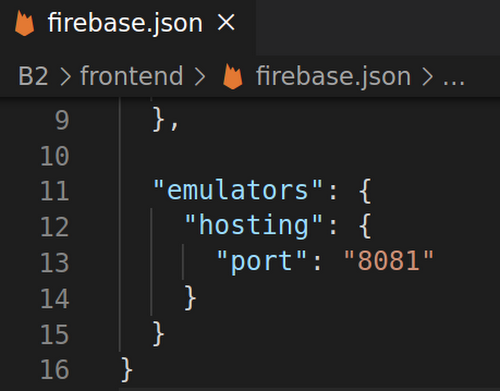
The Frontend and the Backend are running at a different port.
Let’s be explicit in firebase.json and host the Fronted at port 8081:
Then, in a first terminal:
$ cd B2/frontend
$ firebase emulators:start
Finally, I run the Backend in the default port 8080 in a second terminal:
$ cd B2/backend
$ go run cmd/backend/main.go
Cloud Functions for Firebase
Firebase has a nice built-in integration with Cloud Functions for Javascript functions.
My backend is written in Go, which is why I’m using the “traditional” Cloud Functions.
Design for Cloud Run
Cloud Run lets me package the Frontend and the Backend in a Docker image, and deploy this image to production.
In the source repo, this implementation (Cloud Run + Cloud Storage) is called B3.
With Cloud Run come all the benefits of working with containers, and a few more:
- I can code in any language I want,
- using arbitrary binary dependencies (that can work in Linux),
- same container for local dev, QA, and production,
- one single container to host the static assets and the dynamic handlers,
- autoscaling from zero up to many,
- fast cold starts,
- and no complex cluster to manage (this is done by the cloud vendor).
Project structure
The idiomatic Go webapp serves both the Frontend and the Backend. The structure is similar to the B1 (App Engine) implementation.
Using a Dockerfile
To package the server (Frontend + Backend) into a Docker image, we first compile the server for the target platform linux amd64.
$ go build -o server github.com/Deleplace/hot-maze/B3/cmd/backend
Then we ship the executable binary, as well as the folder of static assets. We don’t need to ship the Go source code. The Quickstart sample helps us write a Dockerfile to produce an image with proper CA certificates:
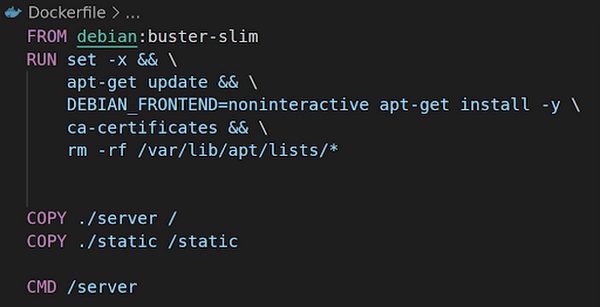
Note: Go 1.16 will make it possible to bundle all resources inside the server executable file, thus not copy the static folder in the Dockerfile.
Service accounts
A deployed Cloud Run service comes with a default Service account enabled.

I had to take a minute in IAM to grant it the role “Secret Manager Secret Accessor”

As explained in the B1 section, accessing secrets lets us retrieve the service account ephemeral-storage@hot-maze.iam.gserviceaccount.com, which is allowed to generate Signed URLs to our GCS bucket.
Local development
When we “just start” our Docker container locally though, there’s no Service account automagically injected. And I would certainly not recommend copying a Service account private key in the Dockerfile, at the risk of checking it in the source repo of container registry.
Following the Cloud Run documentation for local testing, I pass my service account JSON key file as arguments to the docker run command:
$ export GOOGLE_APPLICATION_CREDENTIALS=/local/path/to/sa.json
$ docker build -t hotmaze-b3 .
$ docker run -p 8080:8080 \
-e GOOGLE_APPLICATION_CREDENTIALS=/tmp/keys/sa.json -v \
$GOOGLE_APPLICATION_CREDENTIALS:/tmp/keys/sa.json:ro \
hotmaze-b3
The server is started and available at http://localhost:8080 .
The service account key sa.json was downloaded from the IAM web console and stored somewhere in my local file system. It is not intended to be checked in with the source code.
Deployment
These commands compile the Go web server, build an Docker image, push it to Container Registry, and deploy it to Cloud Run:
$ go build -o server github.com/Deleplace/hot-maze/B3/cmd/backend
$ docker build -t hotmaze-b3 .
$ gcloud builds submit --tag gcr.io/hot-maze/hot-maze-b3
$ gcloud run deploy hot-maze \
--image gcr.io/hot-maze/hot-maze-b3 \
--platform managed --allow-unauthenticated
This overwrites the tag latest every time I deploy. For proper versioning, I may want to use more specific tag names such as release-1.0.0.
Caveat: if the --allow-unauthenticated flag fails for some reason (“Setting IAM policy failed…”), then one may have to run an extra gcloud command provided in the error message, or in the web console go to Cloud Run > Service > Permissions > Add member “allUsers” and grant it the role “Cloud Run Invoker”.
Using Buildpacks
Writing a correct Dockerfile and deploying a container is more complex than “just deploying the code” to e.g. App Engine.
However, Buildpacks are a Cloud Native way to seamlessly containerize and deploy an app from its source code. The main difference with the previous section is that I don’t need a Dockerfile.
Following these instructions, here is how I can deploy Hot Maze to Cloud Run:
$ pack set-default-builder gcr.io/buildpacks/builder:v1
$ pack build --publish gcr.io/hot-maze/hot-maze
$ gcloud run deploy --image gcr.io/hot-maze/hot-maze \
--platform managed --allow-unauthenticated
Static files
For aforementioned strategic reasons, one may want to have a CDN serve the static assets, e.g. Google Cloud CDN. This part is optional and most useful when the app serves a lot of traffic.
Further work
We’ve already seen two performance optimizations:
- Using a CDN for static assets,
- Reducing the complexity of the QR code, with URL shortening.
I can think of a lot more possible improvements of UX, simplicity and performance. I keep those for potential future articles!
Conclusion
In this article we’ve seen how we can structure an app of moderate complexity in order to deploy it to three different serverless platforms in Google Cloud.
All of them are valid choices:
- App Engine + Cloud Storage
- Cloud Functions + Firebase hosting + Cloud Storage
- Cloud Run + Cloud Storage.
You may choose the one that best fits your needs depending on the details of your own workflow, or on unique features of one of them. For example if your app is already packaged as a Docker container, then Cloud Run is the best choice.
If you wish to learn more about the services mentioned above, please check out these resources:
- App Engine Standard Environment for Go
- Cloud Functions for Go
- Cloud Run
- Firebase Hosting
- Cloud Storage
- Cloud Storage Signed URLs
- Serving Static Files with App Engine
- Service accounts
- Secret Manager
- Cloud Logging
- Container Registry
- Buildpacks
- Cloud CDN
- Free things in Google Cloud
- 90-day $300 Free Trial of Google Cloud